This is my review on the MUCH anticipated new versions of the super popular Yamaha PSR-E473 and PSR-EW425 keyboards; the brand new Yamaha PSR-E483 and PSR-E583. The Yamaha PSR-E483 and PSR-E583 are EXACTLY the same as each other, with only 4 differences, so while this review was carried out on my new PSR-E583, it does MOSTLY apply to both keyboards.
The only differences are:
- the PSR-E583 has an expression pedal port & a modulation wheel
- the PSR-E583 has 24 watts of speaker power vs. 12 watts on the PSR-E483
- the PSR-E583 has 30 extra voices
Other than that, these 2 boards are identical; I will outline these differences again during the course of the review. I should also note that the availability of these 2 keyboards may differ depending where you are; in my country (at least at the time of this review), only the PSR-E583 is available (the PSR-E483 isn’t even listed on Yamaha’s website in my country).
So if you follow my channel, you may already know that I owned a PSR-EW425 for a couple of years, and absolutely LOVED that keyboard; I posted quite a few how-to videos on the E473 & EW425 on my YouTube channel. So when I saw some of the specs on the new models when they were announced at NAMM in 2026, I was excited to purchase an E583 as soon as it was available.
Key Action
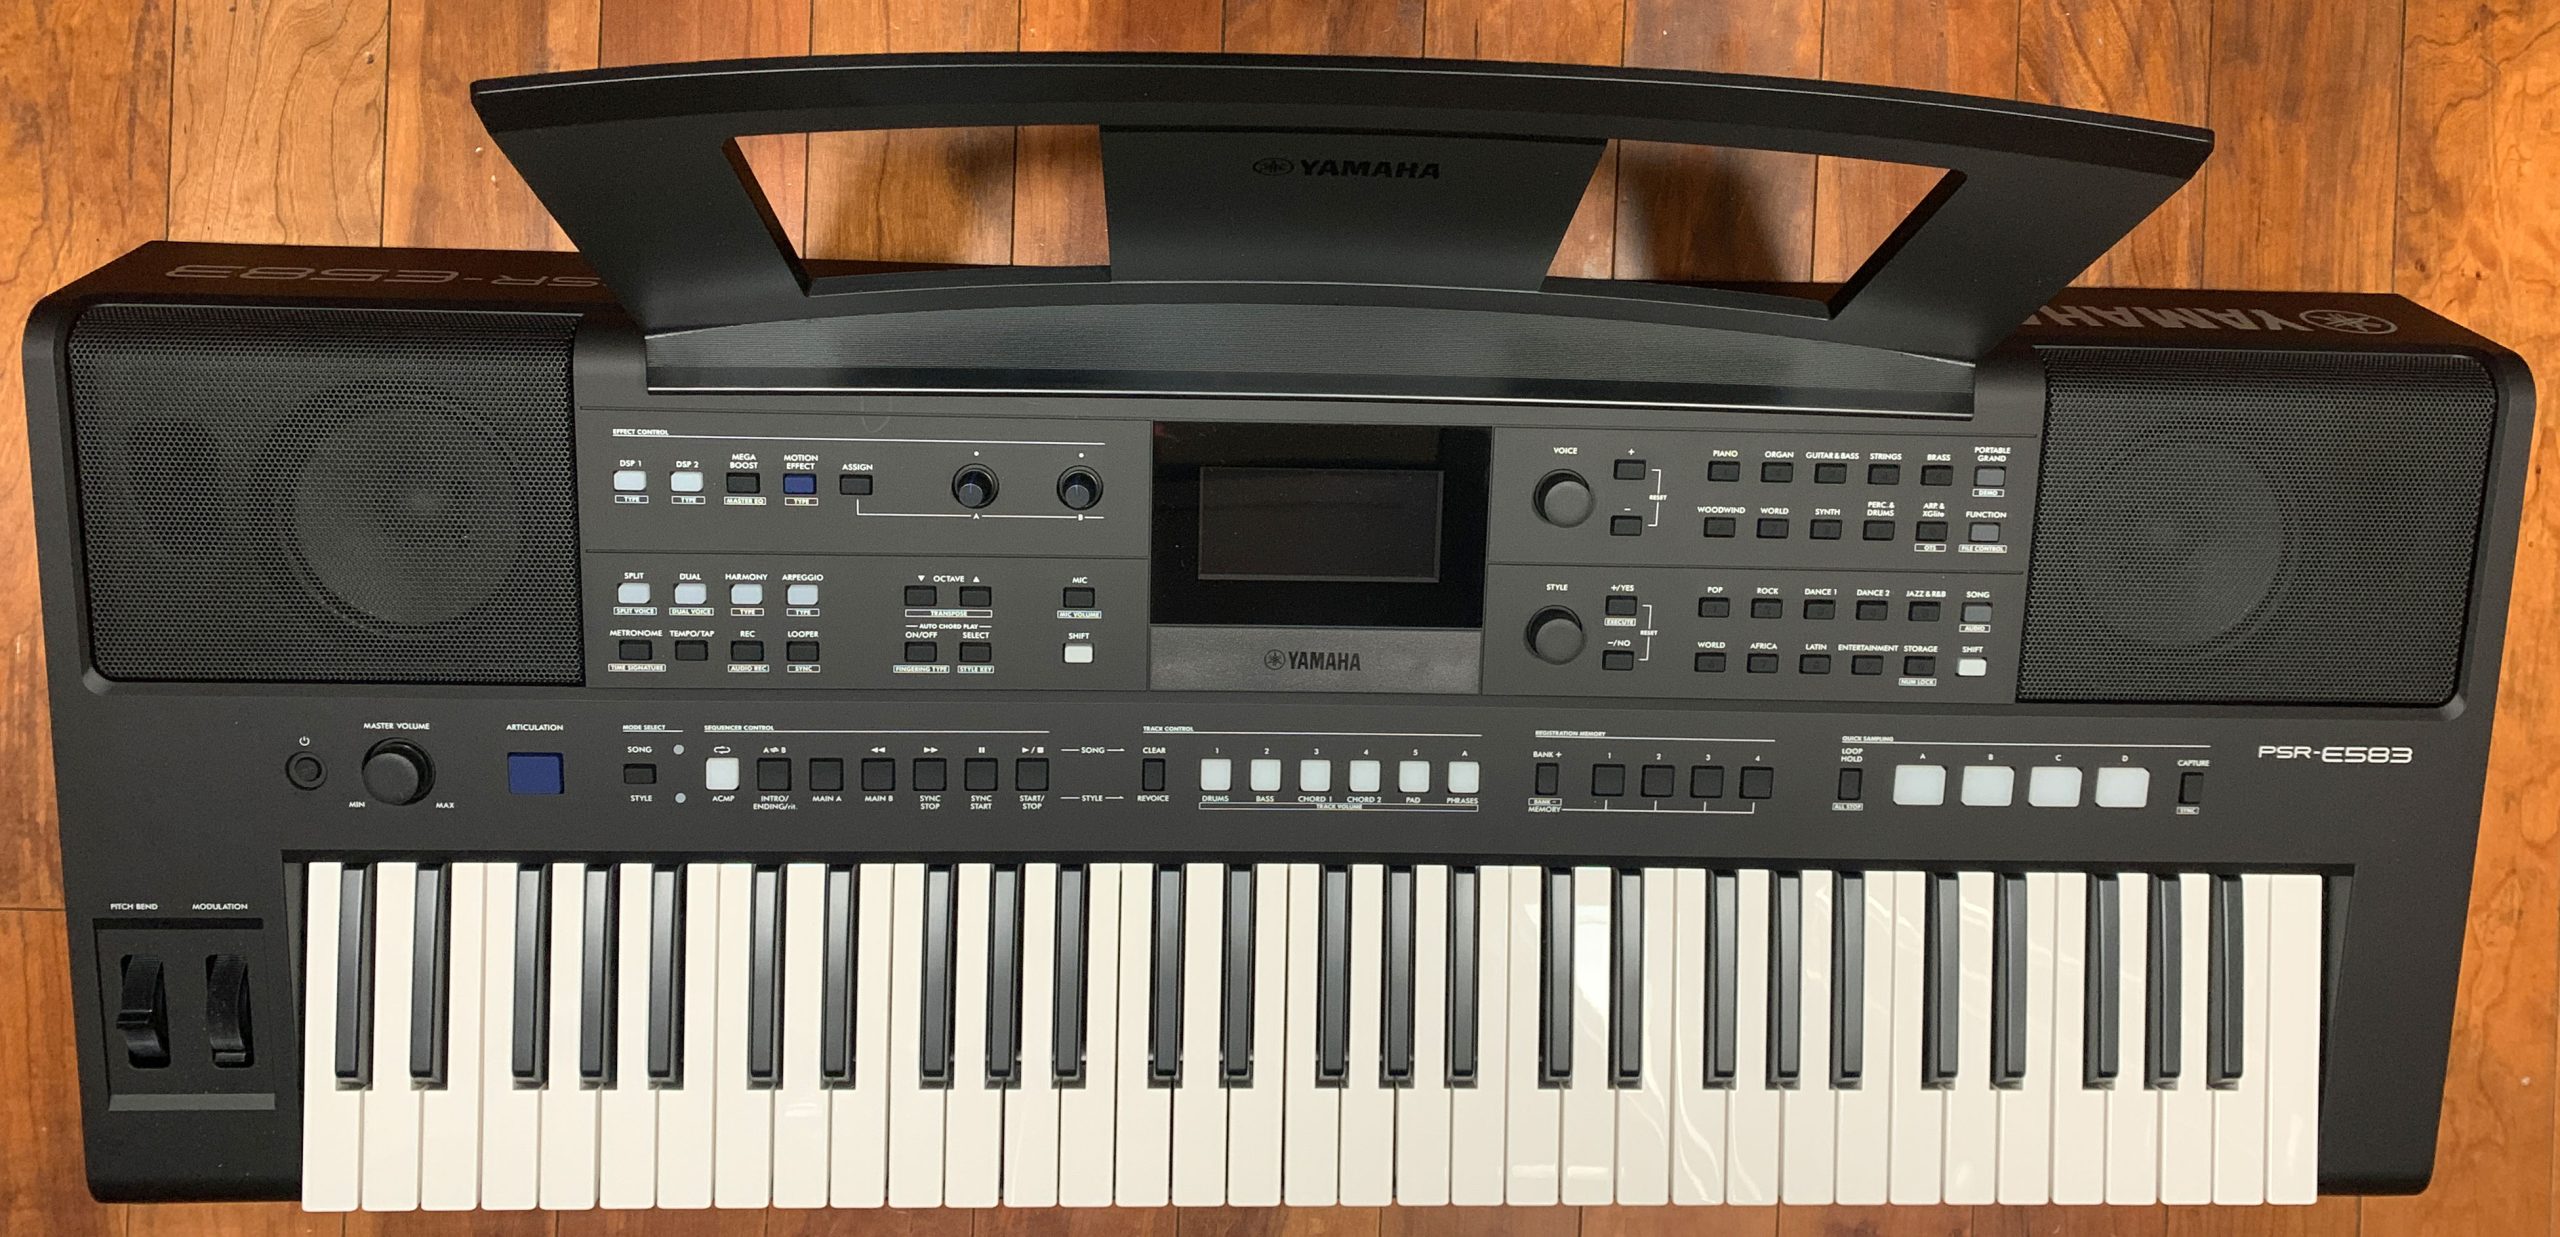
Ok so first things first; you may have noticed that the new models are the E483 and E583, NOT the E483 and EW-something . . . That’s because BOTH of the new models have 61 keys; as far as I know, Yamaha has no plans to release a 76 key “EW” model. I hope I’m wrong, but given that we DO have 2 new models, I highly doubt we will see a 76 key version; it appears the 61 key PSR-E583 IS the official replacement for the 76 key PSR-EW425.
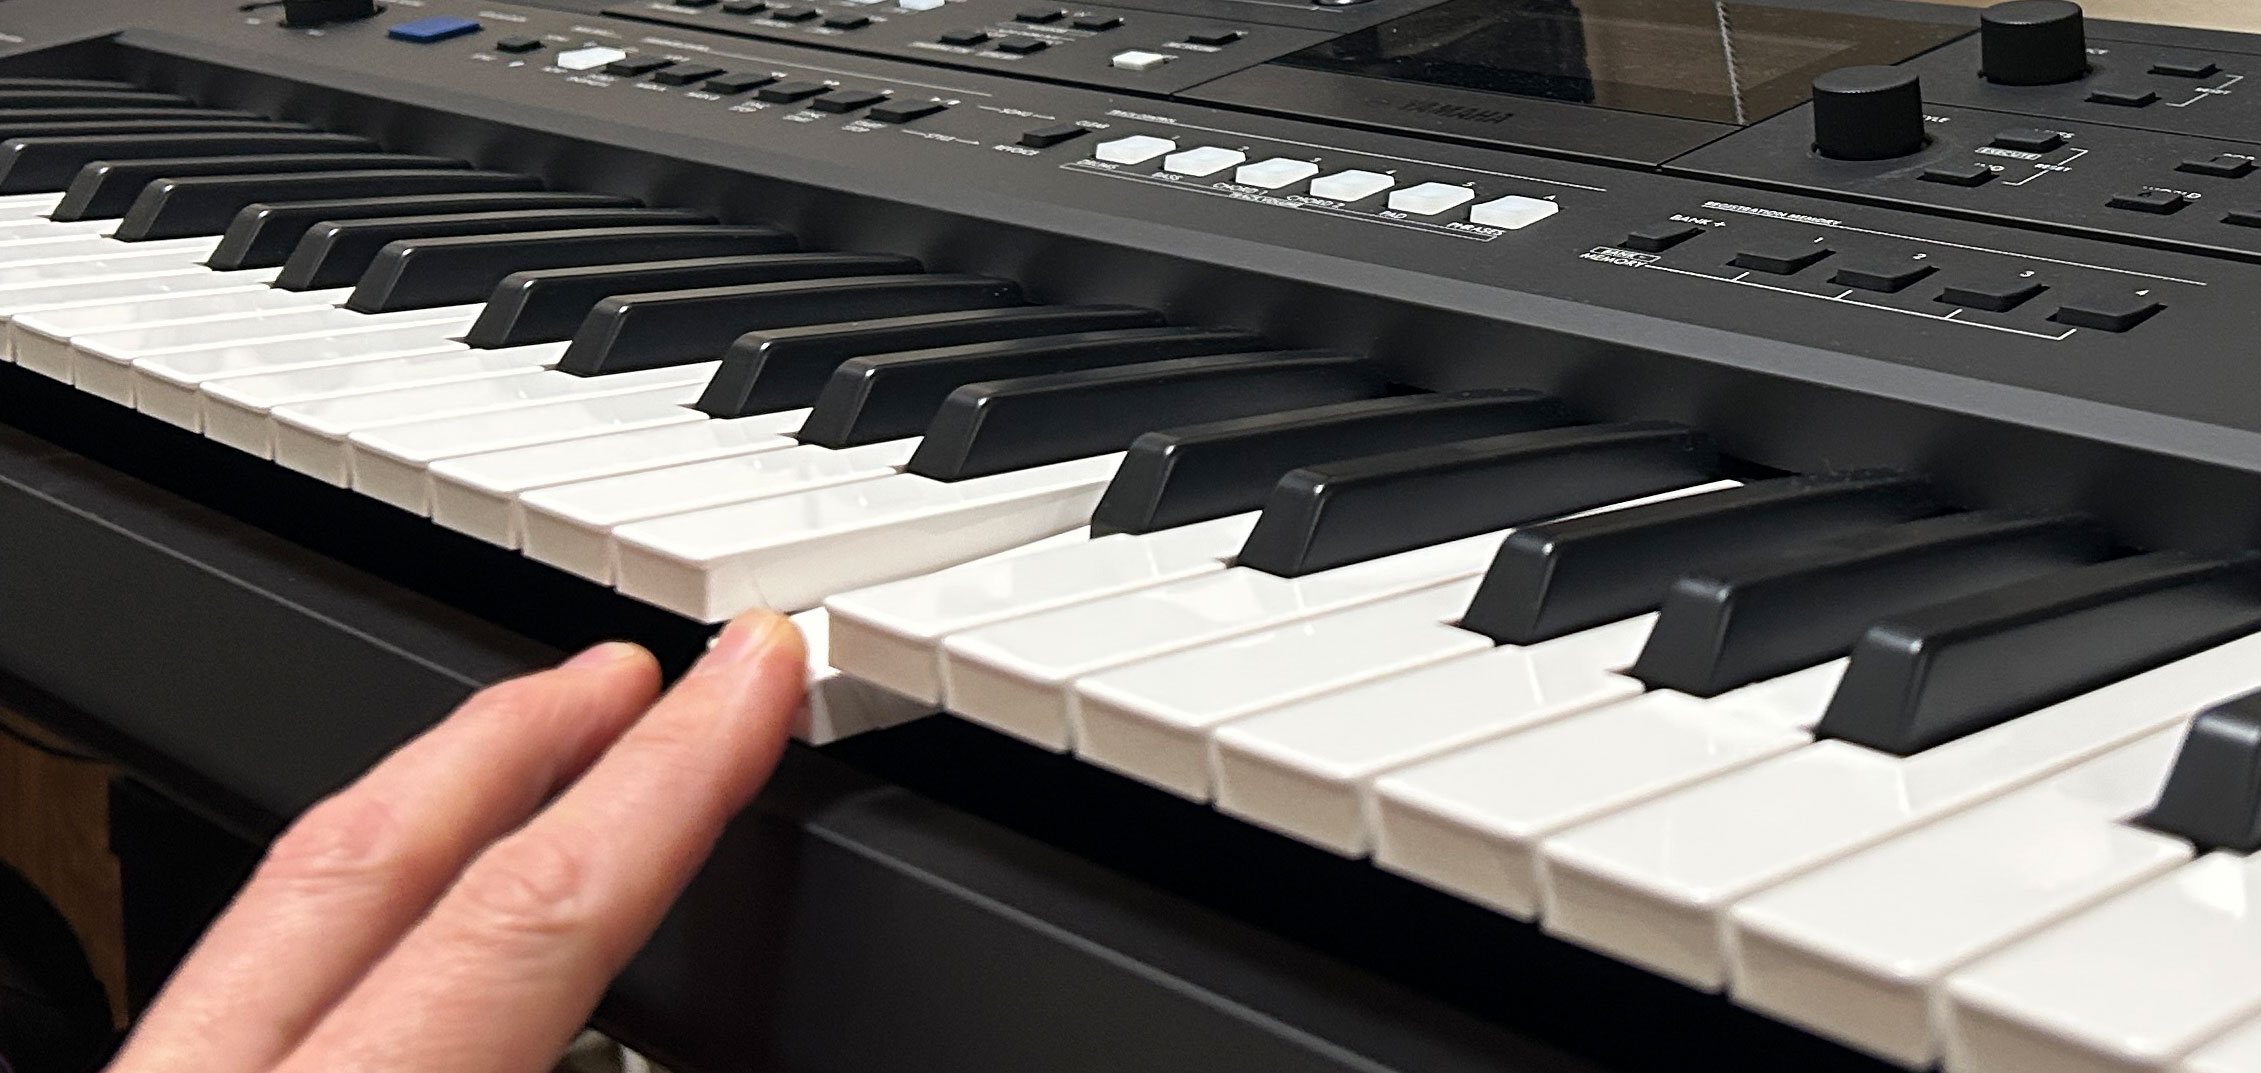
The PSR-E483 & E583 have the identical keybed, which is only described on Yamaha’s specs as “organ style”; this action has been pretty much unchanged (at least overtly) for some time, and as far as I know is used in all of the PSR-E series keyboards, as well as the PSR-SX600. Both models have 61 “diving board” style synth action keys; so these keys aren’t shaped like the keys you find on a piano, which are “box shaped”.
This is a pretty light feeling keybed with 4 layers of touch sensitivity (well . . . 3 layers and OFF). So while this keybed feels NOTHING like a piano keybed or even a semi-weighted keybed, it IS very responsive and fun to play – and once you spend some time with it and find the right touch curve setting for you, it is pretty easy to control your dynamics. I have my touch curve set to hard; I find that works really well for me.
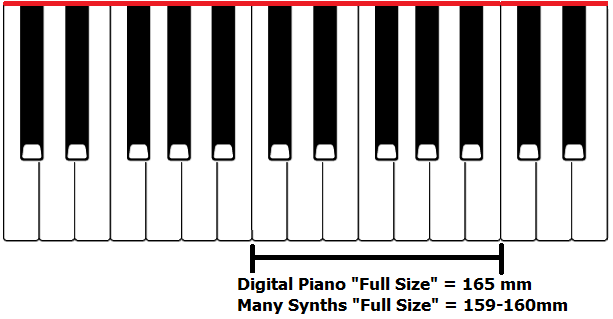
Something to note is that while these keys are marketed as “full-size” they have an octave width of about 160mm which is considered “full-size” by most synth action keyboards, but they are slightly narrower than the standard 164-1655mm octave width found on most fully weighted digital pianos.
Now to be honest, I used to make a bigger deal about this on my channel than I do now; I used to find it more challenging to go back and forth between different octave widths, but now I don’t find it to be a big deal so I wouldn’t worry about this too much, I just wanted you to be aware. Now if your goal is to learn piano and you are considering buying a PSR-E483 or E583? They are still fantastic keyboards to learn on, but just be aware that you will have an adjustment period when you start playing a fully weighted action digital piano, or an acoustic piano.
User Interface
The user interface on the PSR-E483 & E583 has seen some nice improvements from the prior models; more direct access buttons on the front panel (to help minimize menu diving), a MUCH improved LCD screen, and a better workflow for selecting voices and styles. And another BIG change on the new models are a bunch of backlit buttons that indicate whether something is active or not – on the prior models, you’d have to know where to look on the older (and harder to read) screen in tiny print to see if you had splits or layers on or off, which DSP might be on or off, is accompaniment on or off etc; not only is this EXPONENTIALLY easier to immediately see, it also makes the screen FAR less cluttered, which in turn makes the screen easier to read.
One user interface change that is only on the PSR-E583 is a modulation wheel. As far as the modulation wheel goes, it works fine, but it doesn’t appear to be customizable . . . it’s just for modulation. Although there ARE 3 voices where you can use the mod wheel to trigger super articulation as well as using the articulation button. Quick note here: I’d recommend you get in the habit of leaving the mod wheel at the BOTTOM of the range, because when you switch voices, the new voice WILL use the CURRENT position of the mod wheel – some more advanced stage keyboards will have what’s called a “jump vs. catch” option to configure this behaviour, but on the PSR-E583, it WILL just always use the current position of the mod wheel.
Left Side
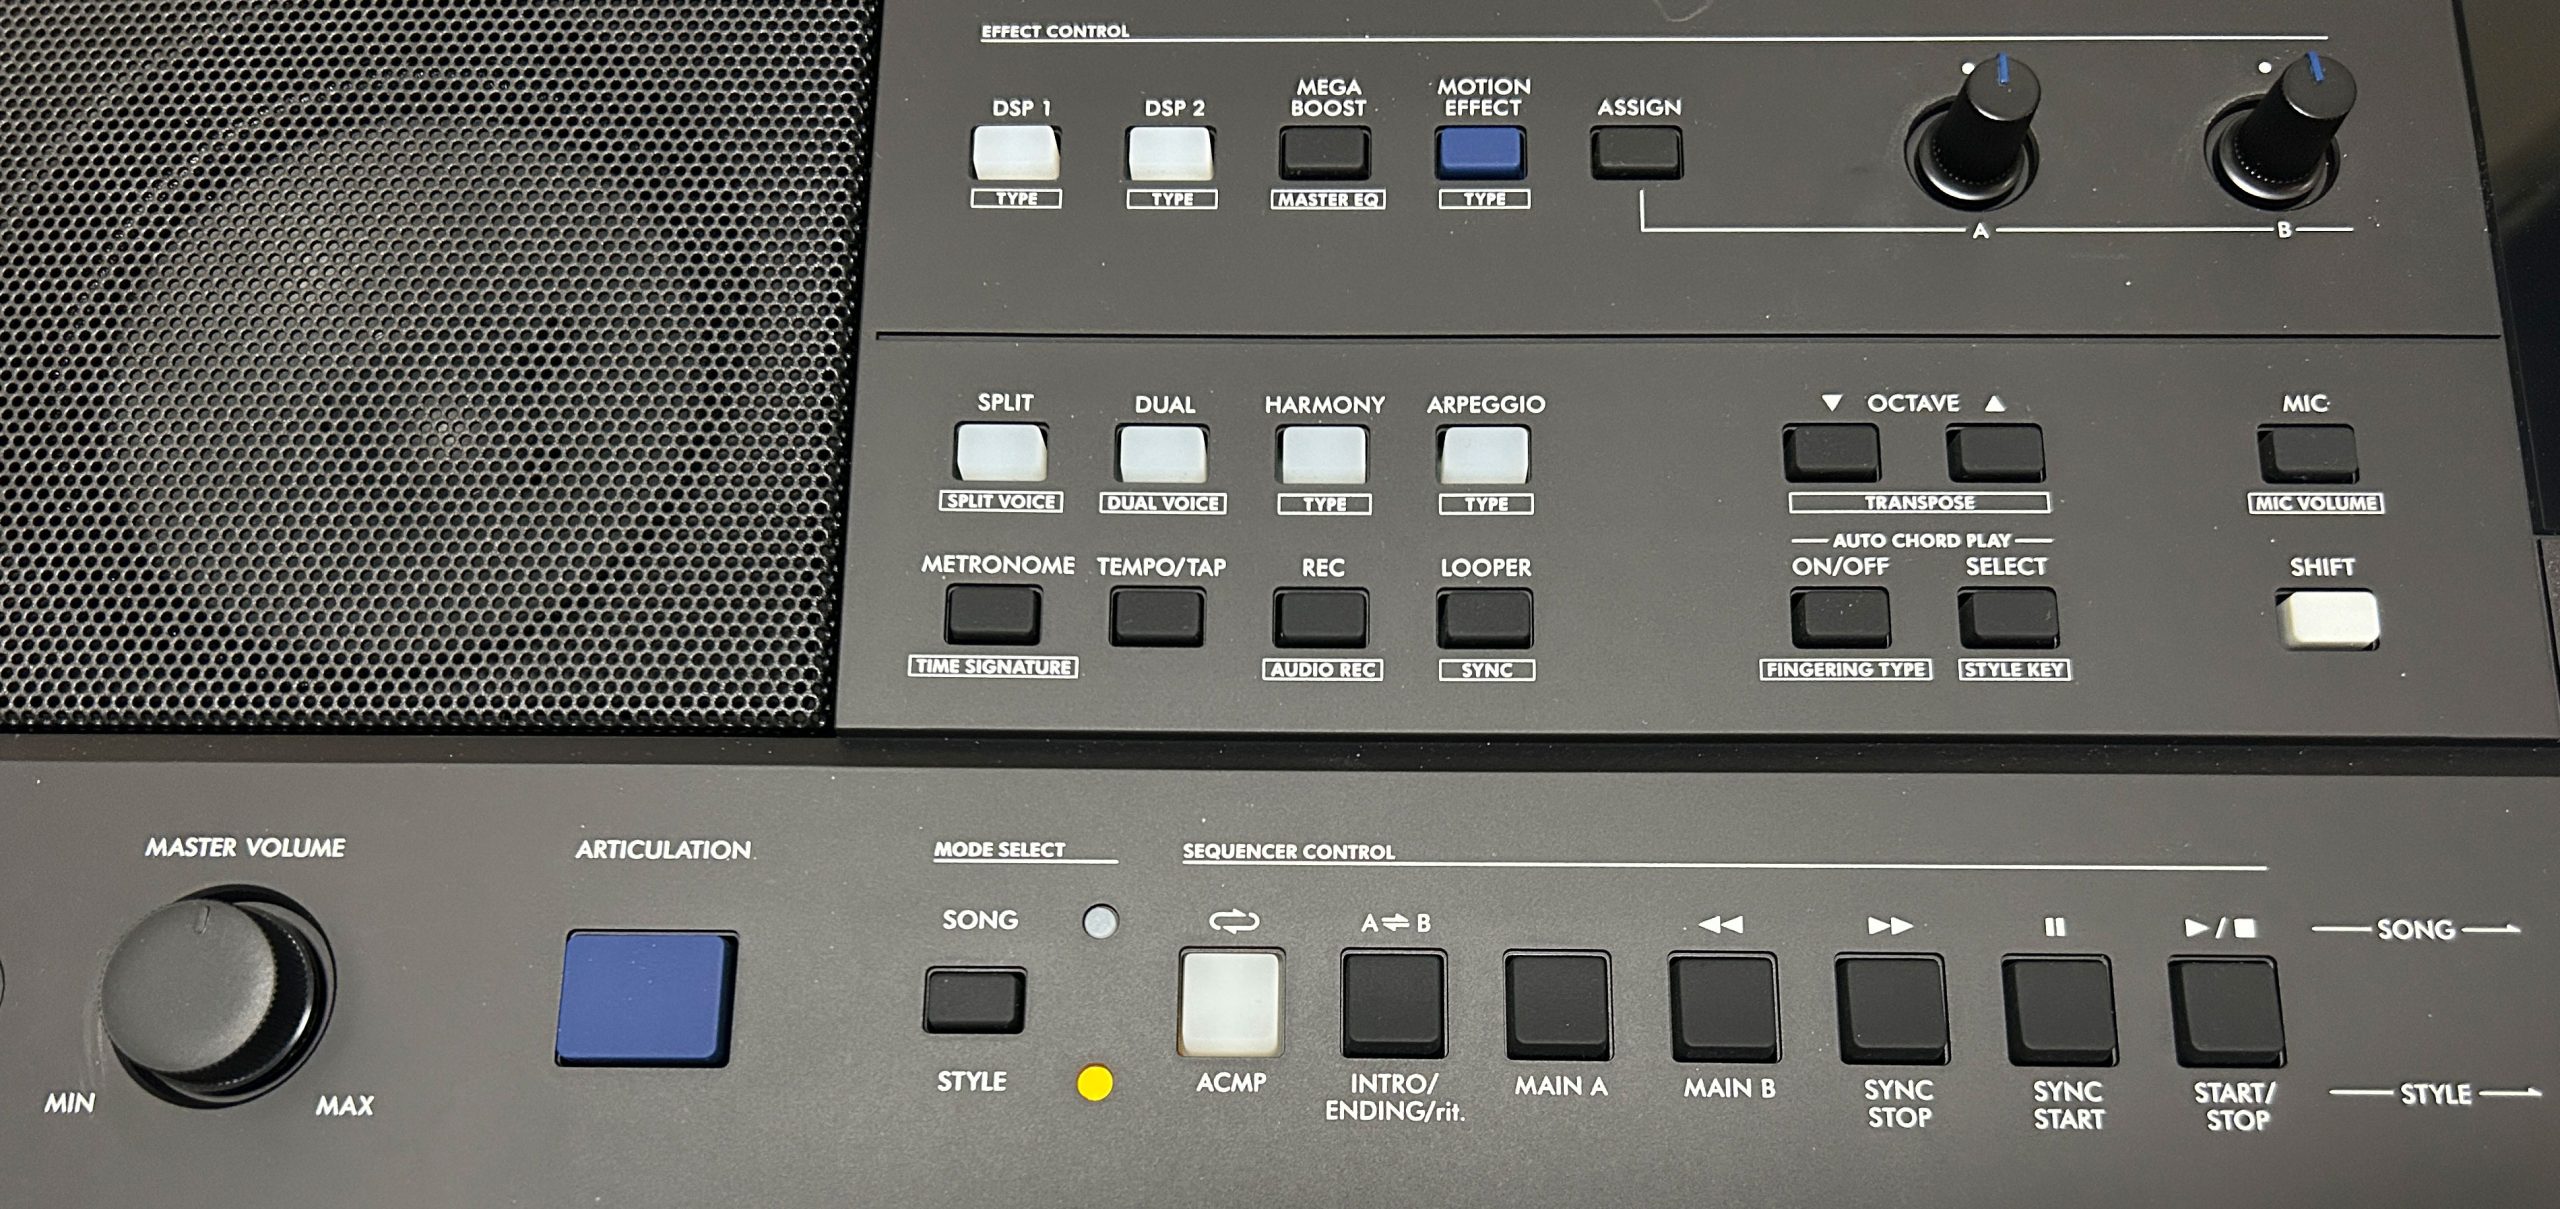
On the bottom left side, we have the super articulation button for triggering sample changes in your super articulation voices, then to the right of that we have the familiar controls for working with your accompaniment styles: toggling between song and style mode, turning accompaniment on or off, intros & endings, changing your variations, starting and stopping etc. Then in the top left, we have some really well thought out direct access buttons that minimize the need for menu diving, including some new ones. And note here that many of these buttons can do TWO things; the text above the button tells you what happens when you press the button; if there’s text below the button, then you can do THAT by holding one of the SHIFT buttons and pressing it.
So up in the effects control section we have buttons to toggle both your DSP1 and DSP2 effects on or off, as well as set what effect is in use; the DSP1 button is a VERY welcome new addition; it was missing on the prior models. Then there are buttons for MEGA BOOST (which gives your speaker power a boost), the “motion effects” and then we have the 2 live control knobs and an ASSIGN button to loop through the available functions for the knobs. Then below that we have buttons for splitting or layering, harmony and arpeggio settings (which have been split into 2 separate buttons – the prior models had these combined into one button). Then we have buttons for the metronome, tempo, recording and looper; and beside those we have (thankfully) buttons for transposing and octave shifting (it’s nice to see front panel buttons for those functions – they can be used often, and many keyboards make you menu dive to change those settings).
Middle
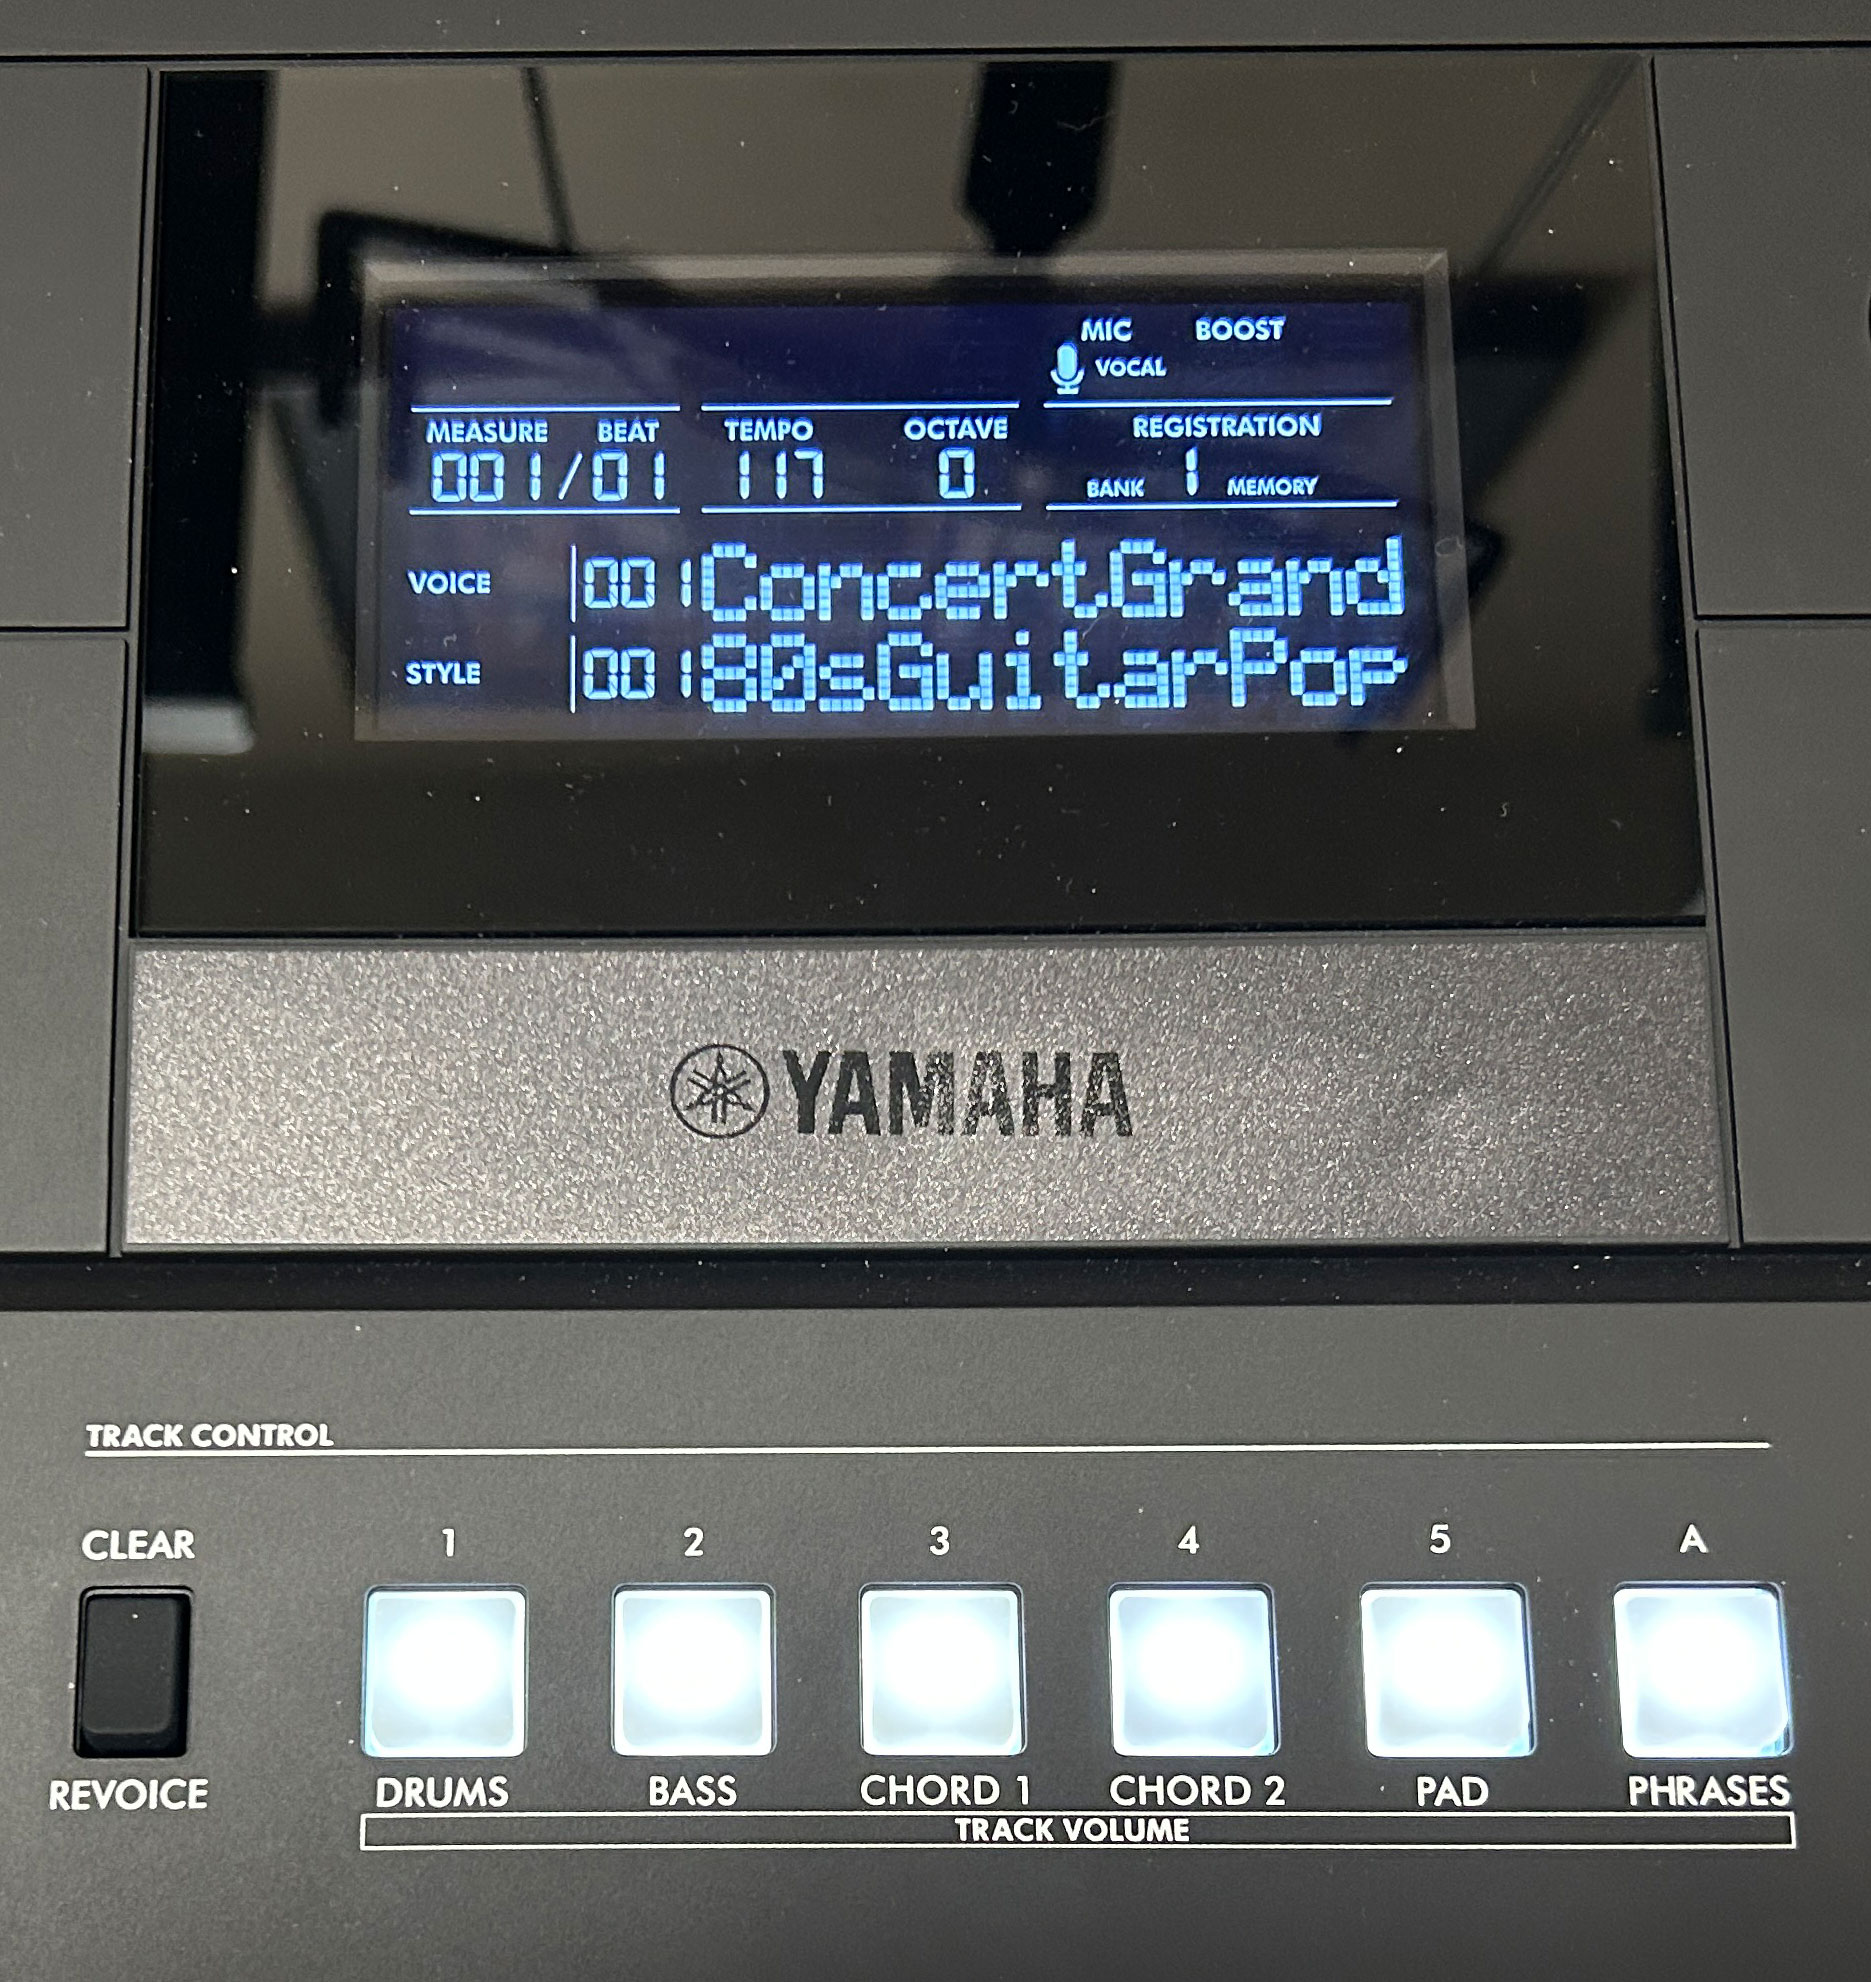
The middle section has a MUCH IMPROVED LCD screen. The prior models had an often hard to read, poorly backlit, low contrast flickering screen – the screen on the new model is EASY to read from ALL angles. And as I mentioned earlier, given that there are so many backlit buttons on the new models that clearly indicate whether something is on or off, there is now much less that NEEDS to be included on the display which makes it even easier to read yet. And below the screen, we have buttons used to mute, enable & revoice style parts, as well as for working with track control when using the multi track MIDI recording features.
Right Side
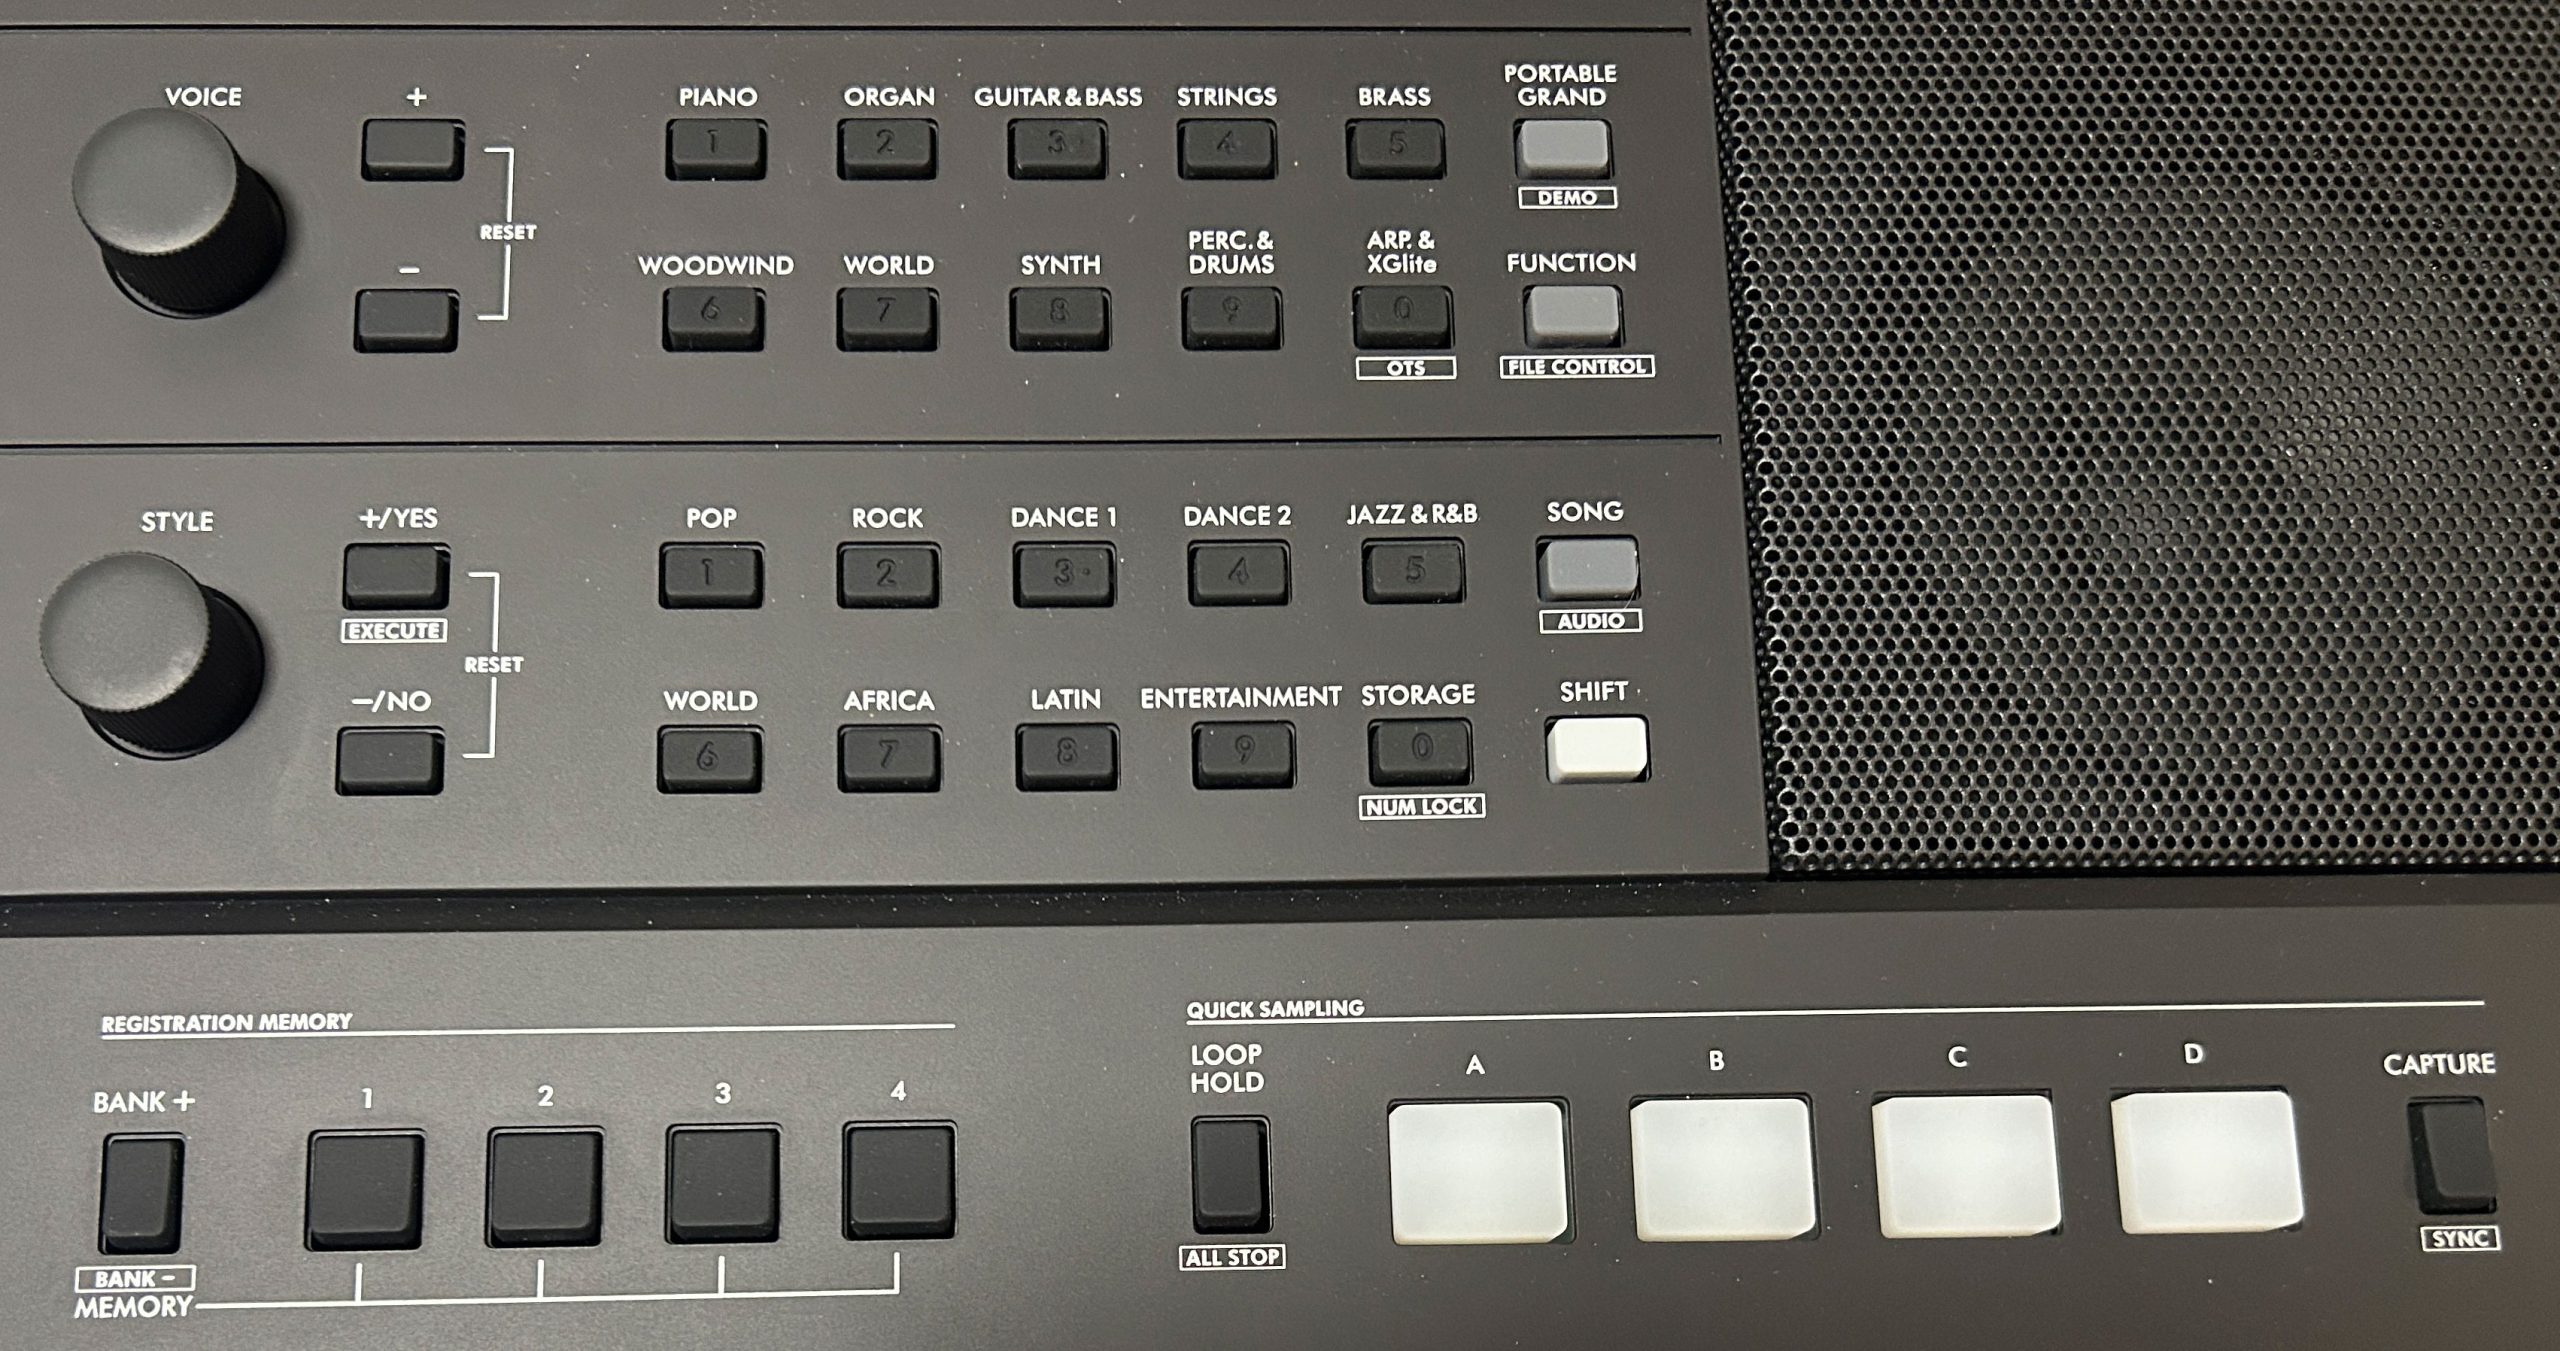
The top right side has 2 SEPARATE sections of controls for selecting voices and styles. This is a MASSIVE IMPROVEMENT from the prior models, which forced you to use a SINGLE set of controls to access BOTH voices and styles. Even after owning a PSR-EW425 for a couple of years and using it ALOT, I STILL always found it frustrating: I’d repeatedly find myself changing my voice when I thought I was changing my style and vice versa.
The new separated controls are a breath of fresh air and are SO much easier to use. Each section has a dial, +/- buttons and category buttons for easy navigation. Then below that we have the buttons for working with registration memory, and quick sampling.
Voices
There are a staggering 890 voices on the Yamaha PSR-E583 and 860 voices on the PSR-E483; this is an increase from the 820 voices on the prior models. And the polyphony has remained the same at 64. In addition to the main 352 panel voices on the PSR-E583 and 322 panel voices on the PSR-E483, there are also 40 Drum/SFXKits, 40 Arpeggio Voices & 458 XGlite Voices on both keyboards.
The panel voices are really the “main” ones (these are the best quality). Included in the panel voices are Yamaha’s enhanced Live!, Sweet! and Cool! voices as well as 19 Super Articulation Lite voices on the E583 and 15 on the E483. I’m definitely NOT going to list all of these, but if you want to check them out look for the “Data List” PDF on Yamaha’s website. As far as the main panel voices go, we have tons of options in the following categories:
- Piano & Electric Piano:
- there’s been a BIG increase here, which is super cool to see: the prior models had 27 in this category, the E483 has 42 and the PSR-E583 has FIFTY (which is almost double!)
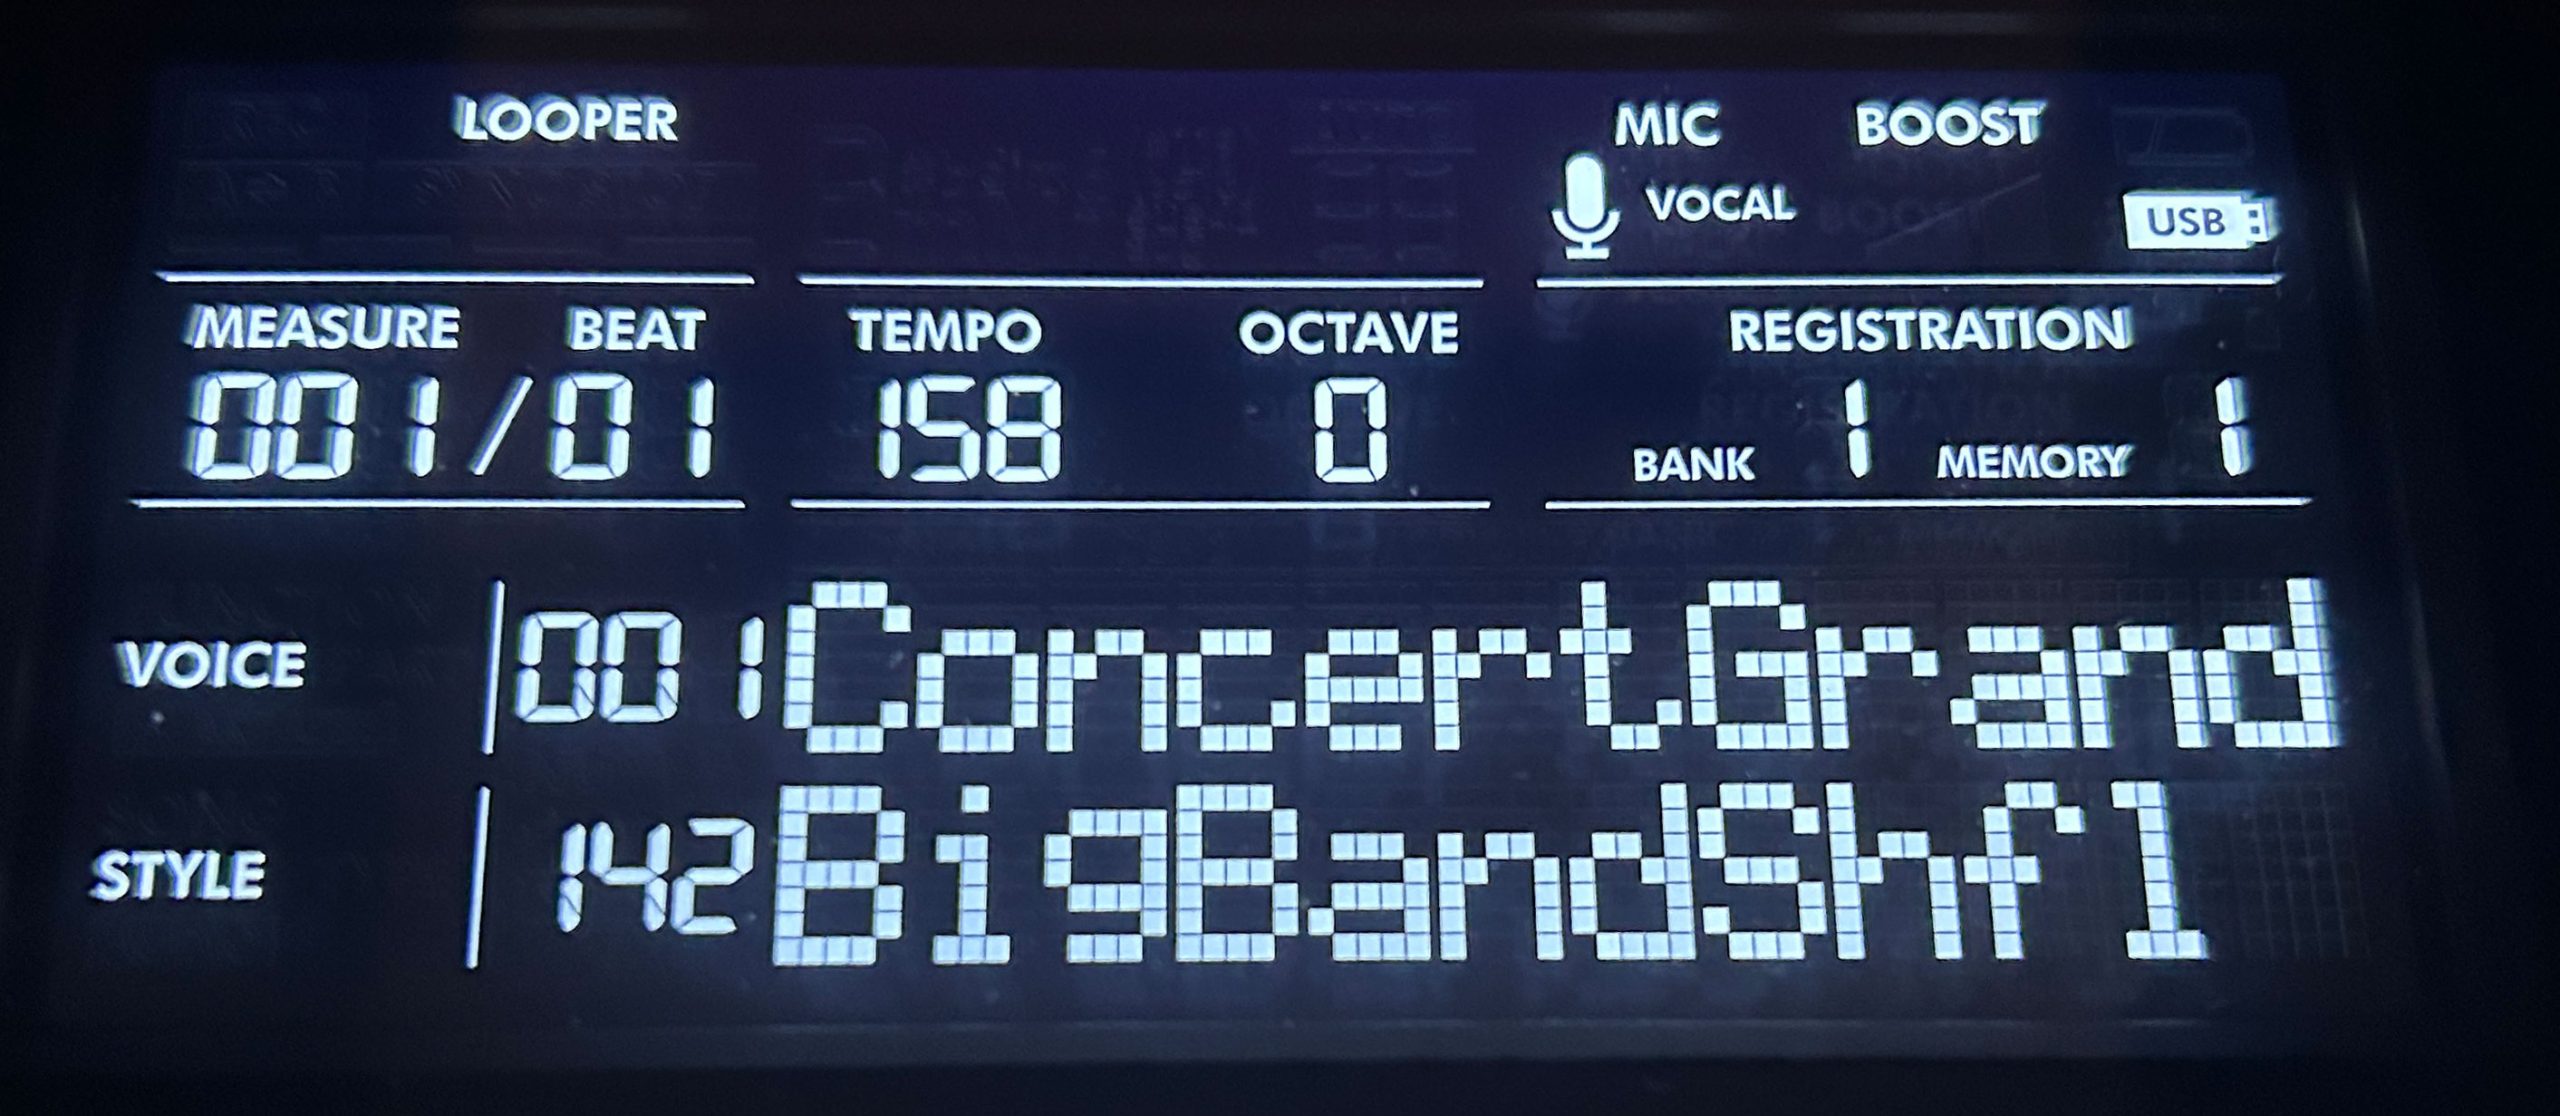
- While the main piano voice on both models is still the “Live! Concert Grand” (which IS an awesome sample), we do have a number of notable new voices including rock, warm & ambient pianos, as well as a number of new electric pianos and pre-layered piano/pad options (I have to say, I’m REALLY impressed with the new options Yamaha has added in this category)
- Organ & Harmonica:
- the organ section has seen a smaller increase going from 36 on the prior models to 38 on the PSR-E483 and 39 on the PSR-E583; the 2 new common ones are church organs, but the 3rd new one (which is only on the E583) is a REALLY good hammond style organ sample with much less of a “shrill” percussion than most of the existing Hammond style organ samples – this is a REALLY welcome addition for me; AND this sample is also a Super Articulation Lite voice – the Super Articulation changes the sample (pretty smoothly I must say) to an organ with more drawbars engaged
- NOTE: The PSR-EW425 had 10 “slightly upgraded” versions of organ voices found on the PSR-E473 (there was added key on click noise and added “leakage”); it was a VERY subtle difference, I could only BARELY tell the difference comparing them back and forth in a studio environment with headphones (I did try an E583 in store next to an E473 (just using speakers) and couldn’t hear any difference…). It wasn’t documented anywhere on Yamaha’s websites as to whether the new models have the EW425’s upgraded versions or the E473’s non-upgraded versions when I made this review, so I reached out to Yamaha to ask, and BOTH the PSR-E483 and PSR-E583 DO have the PSR-EW425’s upgraded organ sounds. To be honest though? I’d use that new Super Articulation organ on the PSR-E583 AHEAD of ANY of those “upgraded” organ sounds anyways.
- Guitar & Bass:
- the PSR-E483 only added TWO guitar and bass voices to the prior model’s 41, but the PSR-E583 has added ELEVEN for a total of 52. Now I’m actually pretty new to guitar voices on keyboards, but since I joined a party cover band a while ago, I’ve been using distorted guitar voices on my Yamaha PSR-SX720 to help cover extra guitar for our band on a few songs; and I remember when I went through those voices on my PSR-EW425 I wasn’t too impressed with many of them; well the new “Power Distortion Guitar” which is only on the PSR-E583 I quite like
- Brass:
- Not a lot of changes in the brass section; the PSR-E483 appears to be the same 28 voices on the prior models, and the PSR-E583 only added 2 for a total of 30
- Woodwind:
- Same thing in the woodwind section; the PSR-E483 looks to be the same 27 voices on the prior models, and the PSR-E583 added 3 for a total of 30
- World:
- The World section has 3 new voices on both the new models, taking the total from 39 to 42
- Percussion:
- Percussion voices have remained the same on the new models, at 13
- NOTE: The “Strings”, “Synth” and “Choir & Pad” categories on the prior models have been combined into just TWO categories on the new models: Strings and Synth, so it took me a bit of work to reconcile all of that;
- Strings:
- the 34 strings voices on the prior models have increased to 35 on the PSR-E483 and 37 on PSR-E583
- Synth:
- The synth section has seen a bit of an increase going from 49 on the prior models to 54 on the PSR-E483 and 59 on the PSR-E583; I play alot of synth in my new band, so I’m hoping this bodes well for being able to use my PSR-E583
The remaining voices include the arpeggio, drums and XGLite voices; the XGLite voices are nice to have, but to be honest I have never bothered looking at these.
Now before I demo some of the voices, one more thing that definitely needs mentioning; while both old models share the same MAIN piano voice with both the new models (the “Live! Concert Grand” voice), the PSR-E473 and PSR-EW425 actually had DIFFERENT second piano voices. The PSR-EW425 had the “Live! Grand Piano” voice, while the PSR-E473 had an older (and noticeably inferior) “Stereo Grand Piano” voice. So I have to admit I’m surprised (and a little bit let down) that the new PSR-E483 and PSR-E583 BOTH still have the inferior “Stereo Grand Piano” voice; I’m not sure why Yamaha included that instead of the “Live! Grand Piano”, but . . . not a huge deal, because there really are some great additions to the piano section, but . . . just a little strange.
But my overall thoughts so far on the voices on my PSR-E583? I liked the overall selection on the prior models, but the new voices are REALLY good, there have been some great additions (especially on the PSR-E583).
So as usual, there are clearly far too many voices to demo, so I’ve picked a few of my favorites to showcase in the following video; I’ll make sure to include some of the layered & split voices, Super Articulation Lite voices as well as a few of the new voices from the Piano category, and also that new Super Articulation organ voice.
Effects
The Yamaha PSR-E483 and PSR-E583 have the exact same effects section, which has been SLIGHTLY upgraded from the prior models (that being said, there really are a ton of these, so a massive upgrade here wasn’t a huge need). For DSP effects there are 2 effects channels you can have active at once; there are 41 options in DSP1 and 12 in DSP2. Then we have 57 types of Motion effects, 15 types of reverb, 7 types of chorus & 5 types of master EQ.
Ok so I’ll start with Master EQ; to choose your setting you can actually hold down SHIFT and press the MEGA BOOST button; this takes you to the “Master EQ” option in the function menu. There are 5 choices there for you to choose from to tweak your overall sound. Now for Reverb and Chorus – quick note: those options are right before the Master EQ in the Function menu, so when you want to adjust reverb or chorus, the quickest way to find those is to once again press SHIFT+MEGA BOOST to get to the Master EQ item then you only have to scroll a tiny bit (instead of pressing FUNCTION and scrolling all the way there). So here, you can choose your reverb & chorus types, and also specify an OVERALL reverb or chorus level. Keep in mind that each of your voices (so your main, layer and split voice) also each have their own INDEPENDENT levels for reverb and chorus if you want to adjust them in more detail. To get to those, you’ll need to move further up in the Function menu.
Now as far as the MOTION EFFECT goes; kind of like Super Articulation, this allows you to alter your sound by holding down a button while you play. Now to be honest, I didn’t use this ONCE when I had my PSR-EW425; but now that I’m playing alot of synth sounds in a pop rock cover band, I might be able to see some uses for me. You can hold SHIFT and press the button to choose which effect you want.
Ok so on to what I think is the most interesting effects on these keyboards, and that is the DSP section. Both DSP1 and DPS2 now have direct access buttons on the front panel to both toggle them on and off, AND to easily choose what effects are being applied without having to menu dive. And as I mentioned in the user interface section, these buttons are now backlit when the effect is active, which is a MASSIVE improvement over the prior model where you had to know where to look on that hard to read LCD screen.
So is there a difference between DSP1 and DSP2? Actually there is a big difference; DSP1 only applies to your main voice; DSP2 can be applied to everything, OR: JUST to the voices (main, layer AND split), JUST to the accompaniment, JUST to the mic input, or JUST to sampling pad playback. So when I go to choose a DSP1 effect, notice that I can only navigate through effects types; if I go to the DSP2 screen, I can use the top knob to choose what DSP2 applies to, and then use the bottom knob to choose my effect. Now FYI, the default for DSP2 is “everything” so keep that in mind if you really only want it applied to your voices (which at least in my case would be every time; I’m kind of surprised that’s not the default). Also note that even if a DSP1 isn’t activated by default on a voice, there is a default DSP ready to go that IS appropriate for that voice; for example if I load the main piano voice, there is no DSP1 active, but the default is a “detune” effect that sounds cool with a piano. DSP2 usually just defaults to the first effect in its list which is a Rotary speaker.
So what about live control of our effects? The new models still have 2 live control knobs that we can use to control various things on the fly. To make a choice, you press the ASSIGN key, and then you can choose between using the knobs with 1 of 3 “parts”:
- Keyboard (so your voices)
- Cutoff/Resonance
- Reverb/Chorus: so for example, if I choose this option I have immediate control over reverb and chorus
- Main/Dual Volume: this is a great choice if you’re using a layered voice that you’d like to be able to bring in and out while playing
- DSP1 parameters: what the buttons will do here depends on the effect chosen; you can look up all the available effects and parameters in the Data List PDF on Yamaha’s website; as a quick example if I choose the Gospel Shout organ voice, Knob A will control the rotary speaker speed and knob B will control the balance between the bass and tweeter rotary speakers
- Backing (the accompaniment)
- Cutoff/Resonance
- Reverb/Chorus
- System (this is just for DSP2)
- DSP2 parameters
So with all of these effects at your disposal, you have a crazy amount of options and combinations to fine tune your voices to your liking.
Rhythms & Accompaniment
The PSR-E483 and PSR-E583 have 345 rhythms which is up from 290 on the prior models, from a wide variety of genres, and there are 10 slots available for expansion styles. There are 2 variations of each, with optional sync start, intros, endings, fills as well as optional accompaniment, which includes backing bass and a rhythm section. The accompaniment features themselves on these new models are pretty good, but largely unchanged from the prior models.
As far as what’s new regarding the available styles, to be honest it’s not super easy to tell; Yamaha has reorganized the categories quite a bit with these models. I’ve done my best to try and reconcile the total NUMBER of styles in the different categories (but I didn’t actually go through all the style NAMES on the new and prior models in any detail).
- Pop: appears to now include the Ballad category – looks like about 5 new styles overall here
- Jazz/R&B: this looks to be a combination of Swing & Jazz with R&B – 1 new style here
- Rock: looks like 3 new styles
- Latin: looks like 8 new styles
- Dance: 28 new styles here
- Entertainment: this category now also includes the Pianist category; overall looks like 3 new styles
- World & Africa?: the World1 & World2 categories appear to now be World & Africa; if that’s correct there are 7 new styles here total
A couple of awesome features with the rhythms and accompaniment that are brought forward from the prior models: first, you can adjust the rhythm & accompaniment volume if you want it adjusted relative to the main voice you are using which is awesome – FYI that’s #30 in the Function menu. Another couple of cool features brought forward are the ability to mute style parts if you want some simpler accompaniment (I often play along with just bass and drums – and this is super easy to do with the backlit style part buttons). And what’s even cooler is the ability to re-voice style parts. So for example, if I really like the 80’s Guitar Pop style, but I don’t like the guitar sound on “Chord1” I can hold down REVOICE and press the CHORD1 button and then choose any voice that I want, like an . . . organ voice.
For chord fingering options. I was really hoping (and kind of expecting to be honest) that Yamaha would finally catch up to the competition and start including more chord fingering options, but . . . no luck! We are still stuck with only 2 chord fingering options; Multi-Finger and Smart Chord. That being said, Yamaha’s version of multi-finger is actually a combination of TWO mode: a typical multi-finger approach WITH a wizard mode you often see on other keyboards but as a separate mode (more on that in a second). Being a piano player at heart, I especially would have liked to have seen some full keyboard chord detection modes. Competition from Casiotone offers 5 chord detection modes, and Roland offers 4, so Yamaha is still lagging behind in this area. You can choose your fingering option with one of the nice new panel buttons on these new models: you can hold SHIFT and press the ON button in the “Auto Chord Play” section (more on that feature in a bit).
Multi-Finger
So Multi-Finger is a standard fingering option you find on pretty much all arranger keyboards; with accompaniment turned on, you finger chords using your left hand which tells the accompaniment what to do, and you play whatever you like in your right hand. Something to note is that since Yamaha doesn’t offer a “fingered on bass” mode for slash chords, playing a chord inversion works but WON’T sound any different than just playing the chord in its root position. For example if I play a C major chord in root position, it will sound the same as playing this C major inversion with a G at the bottom; on keyboards with fingered on bass modes, fingering the chord this way would tell the virtual bass player to play a G note while the virtual guitarists stay on C.
Something else to mention about Yamaha’s version of Multi-Finger is that you can trigger a major chord just by playing the root note, you can trigger a minor chord by just playing the root and minor third, and you can trigger a 7th chord by playing the root and the minor 7th. So this is OK by me, since you ARE actually playing notes from these chords.
BUT . . . as I mentioned earlier, Yamaha’s Multi-Finger mode is kind of like 2 modes in 1 because it also includes a “wizard” mode you often find on competitor’s keyboards (but as a totally separate mode); for example the Casiotone CT-S500 has a “Fingered Assist” mode that behaves this way. Now I’m NEVER a fan of any “wizard” modes like this, because in my opinion, they just teach you REALLY bad habits. And why is that? Because these modes allow you to play minor or 7th chords with only 2 fingers, BUT you’re not actually playing notes that are IN THOSE CHORDS. To play a minor chord, you play a root note with the closest black note to the left; so for example, if I play a C note and the Bb directly to the left, I get a C minor chord (even though Bb is NOT a note in C minor; it’s ACTUALLY a note in a C7 chord). And to get a 7th chord, you play any root note and then the closest WHITE key to the left. So if I play a C note and the B note directly to the left, I get a C7 chord (even though B is not a note in a C7 chord). To me this is just anti-productive for a new player. If you’re a total beginner and you want an easier way to get started playing accompaniment, I’d recommend using Yamaha’s “Smart Chord” mode instead.
Smart Chord
Now as I mentioned, I’m never a fan of “wizard” modes that use weird key combinations to TRY to make things easier for a beginner, but Yamaha’s “Smart Chord” is actually a well implemented option for beginners. With Smart Chord, you specify the key signature for a song, and then you can play chords just using a single finger on the root note. So for example, if your song is in the key of C, and you see a D minor chord on your music sheet, you can play that just by pressing a D note as opposed to having to finger a full D minor chord. Without getting too far off topic, if you know some music theory, all that’s happening here is the keyboard is playing back the diatonic chords for the key signature you specified (and if you don’t know what I mean by diatonic chords, don’t worry about it-just specify the key signature from your song sheet and then just use a single finger to play the chords you see.
So to specify the key signature from your song sheet, hold SHIFT and press the SELECT button in the Auto Chord Play section; then scroll through to find the correct key for your song. So as an example, I’ll choose G Major (note that you actually see G / Em on the screen; that’s because Em is the relative minor of G Major, so . . . same scale and same chords). Also, a nice extra here from Yamaha; if your music sheet doesn’t explicitly SAY what the key is, you can actually look at the number of sharps or flats on screen – the key of G has one sharp, so you see SP1 on screen so you can look at that as well if needed.
So with the accompaniment playing, if I play just single notes from the G major scale with my left hand, I’ll get the following diatonic chords:
- G (1): G major
- A (2): A minor
- B (3): E5 (this is basically a power chord, neither major or minor)
- C (4): C major
- D (5): D7
- E (6): E minor
- F# (7): F#7 b5 (diminished)
So while Smart Chord could be described as a “wizard” mode, at least you’re not being conditioned to play notes that aren’t part of a chord, and you’re reinforcing where notes are on the piano, and also making the player familiar with what chords you usually see in different key signatures.
That being said, I would still highly recommend that even as a beginner, you’re best off learning how to finger chords in your left hand and that you stick with the Multi Finger mode.
Auto Chord Play
Ok so Auto Chord Play is one of the new features on the PSR-E483 and E583 that I was pretty excited to check out when I heard about it. There are 93 common built in chord progressions you can play along with using any of the styles and at any tempo (and you can easily transpose them to different key signatures), all WITHOUT having to finger chords yourself. This is a great way to practice comping, soloing or even scales. So to activate Auto Chord Play, just press the button and you’ll see the indicator appear on screen; to choose a chord progression, just press the SELECT button.
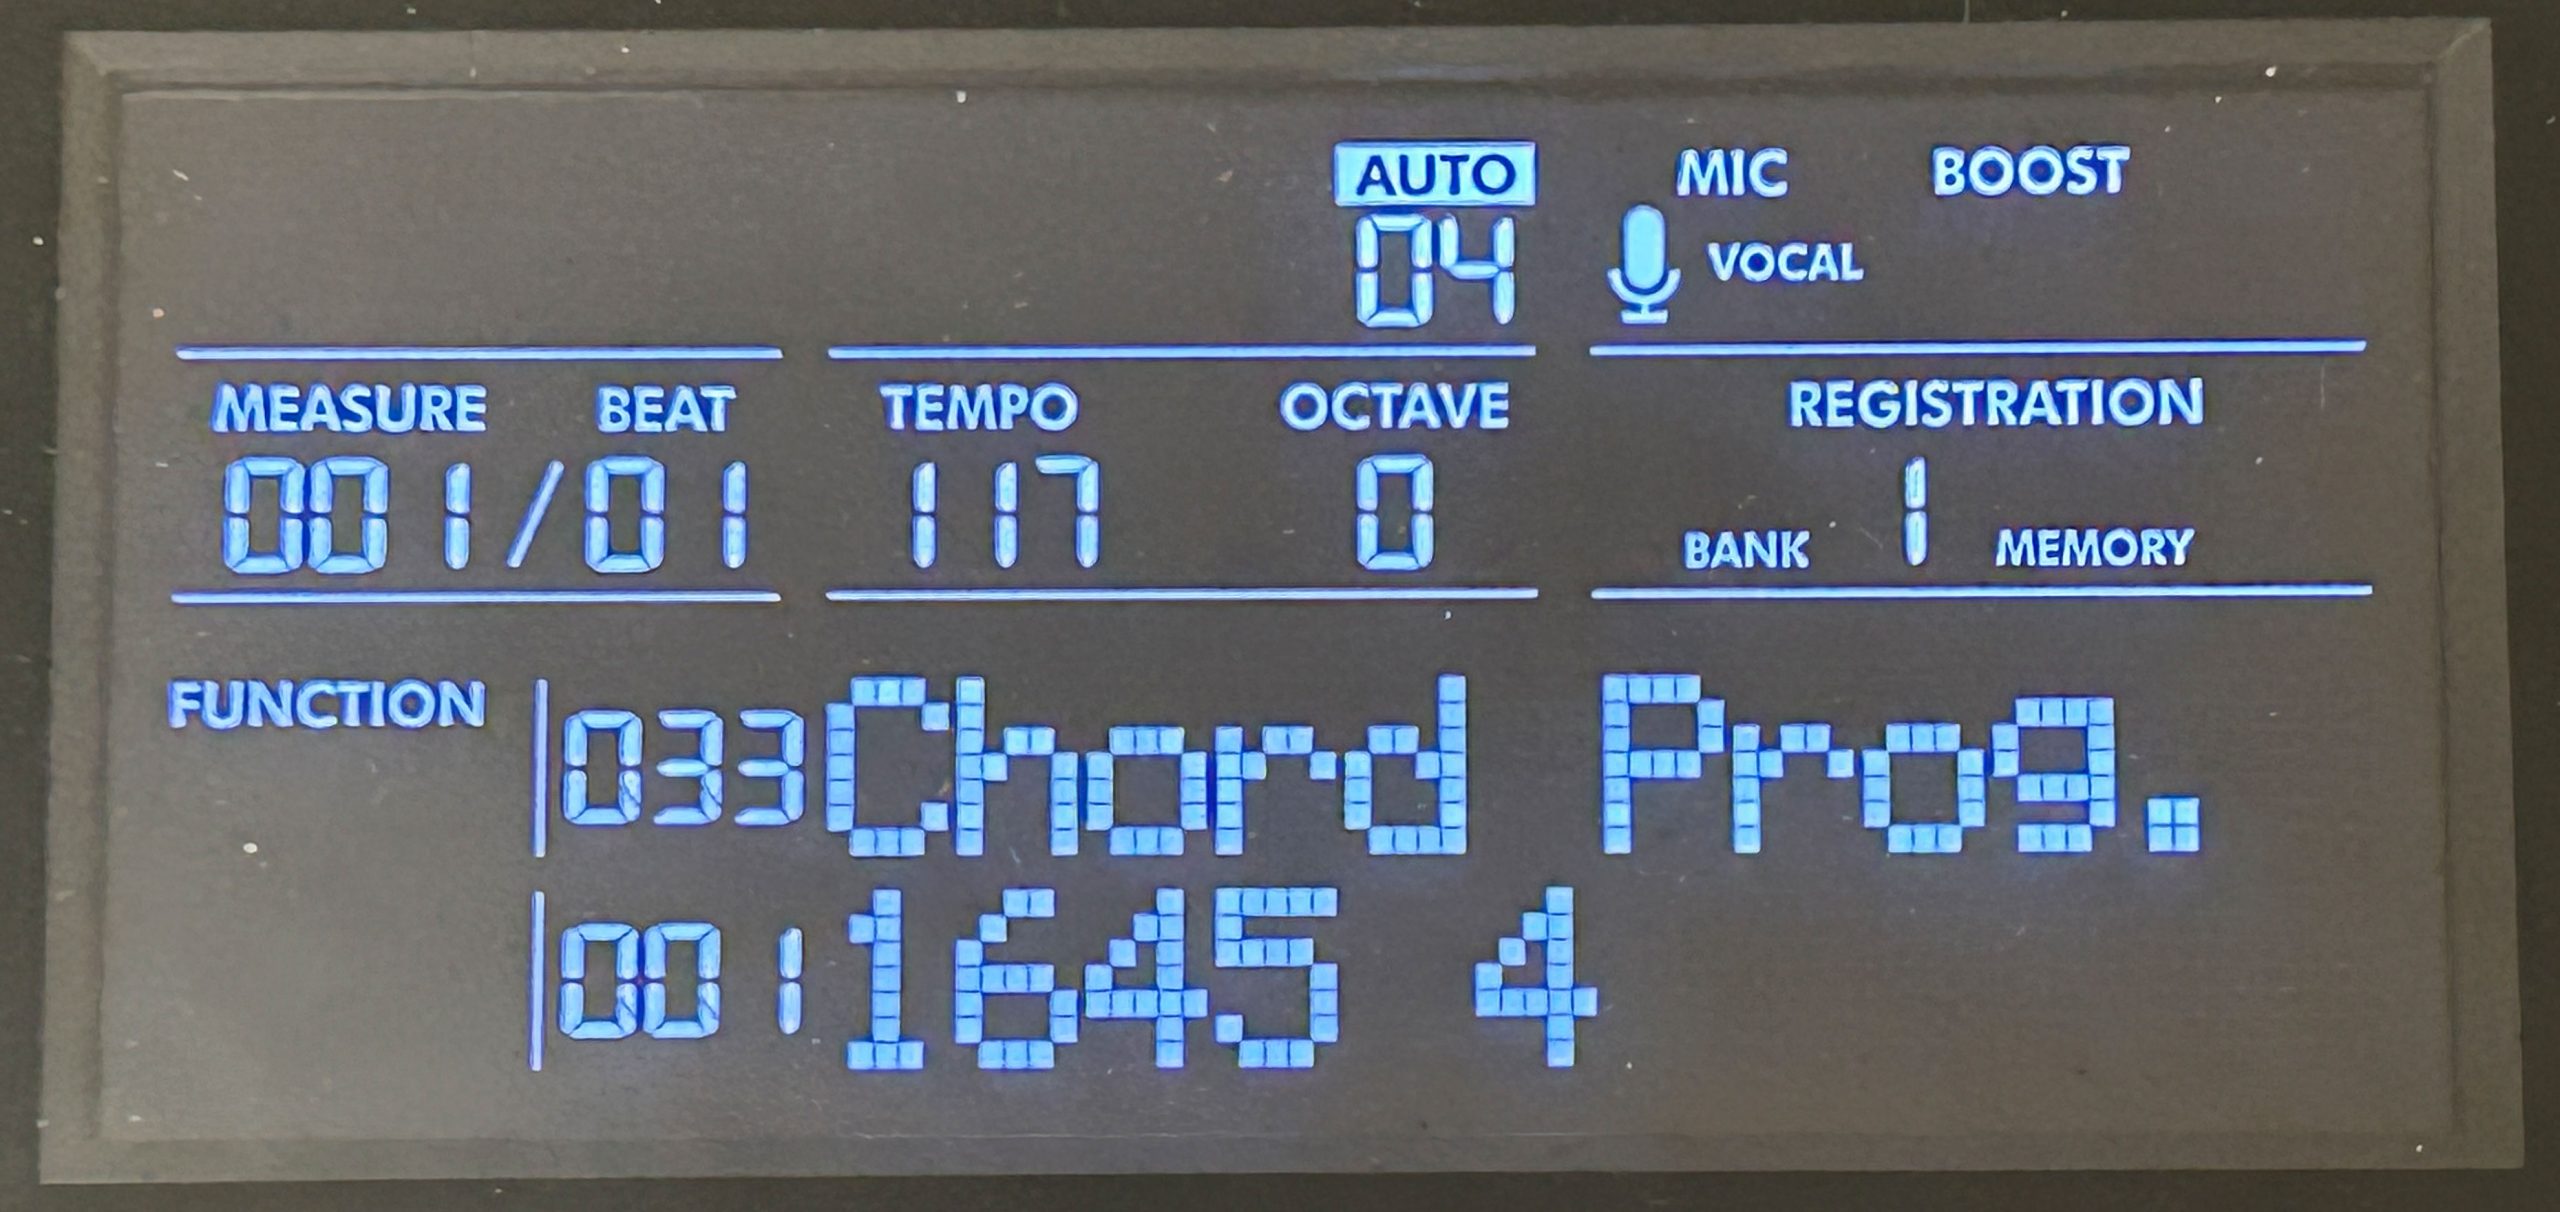
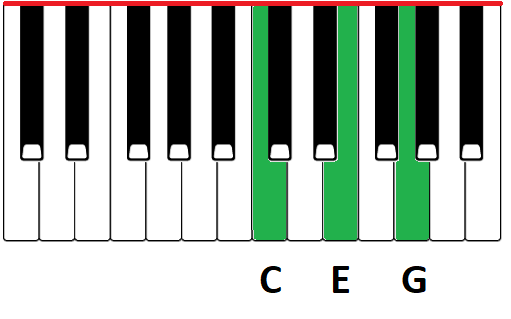
So you can scroll through the built in chord progressions; most of them indicate what they are using diatonic chord numbers; for example the first one is the 1-6-4-5 progression, which is a pretty common chord pop ballad chord progression; beside the chord numbers you’ll see an indication of how many measures the progression is at which point it will loop and start again. Now if you aren’t familiar with the diatonic chords you’re going to see, you can look all of these up in the data list PDF on Yamaha’s website; they’ll be indicated in the key of C. So this 1-6-4-5 progression in the key of C will be C-Am-F-G; since this is often seen in ballads, a good style choice for this might be “#36-UnpluggedBallad” in the Pop category.
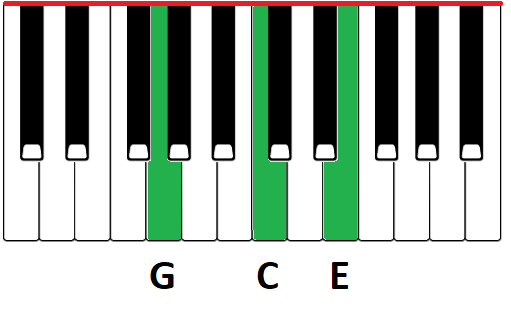
So when you press play to start this, you’ll hear the accompaniment start up, and automatically switch through the chords in the progression (which you’ll see displayed on screen) without you having to do anything. So you can play along with BOTH hands without having to worry about any chord changes. And notice that if you play a chord in your left hand that is NOT in this progression, say a D minor – you’ll HEAR the chord being played but it has NO effect on the accompaniment, so this is super cool. Now what if I want to play this progression but in a different key, let’s say the key of G major? Just like with the Smart Chord fingering mode, you just specify the “Style Key” (by holding SHIFT and pressing the SELECT button in the Auto Chord Play section) and then I can choose the key of G instead. Now when I press play, I’ll get the 1-6-4-5 chords in THAT key which are G-Em-C-D. So this really is a great tool for practicing; you can practice comping, solos or even scales; I almost always practice scales over some type of backing, because not only is it WAY more fun and engaging, but it helps lead you into soloing.
So if I scroll further down the list of built in progressions, first thing to note is some of them are described with a name instead of the diatonic chord numbers (there are a number of 12 bar blues options for example); but then as I scroll further you might be asking “I thought you said there were 93 built in progressions . . . don’t they go to 100?”. Technically that’s true, BUT progressions 94-100 are all just ONE chord (C) in either 3/4 time or 4/4 time, and they vary in how long they are (in number of measures). So what are these for? These are to help you create your OWN chord progressions.
You can create up to 10 user chord progressions; & that was actually the part of Auto Chord Play that I was the most curious about – Will I be able to use this to make a full backing track for a song? Well . . . unfortunately it doesn’t look that way (unless your song is REALLY short); it doesn’t look like you can create a chord loop that is longer than 16 measures.
The way the custom loops work is kind of strange; you have to start with an existing loop, and then you edit it and save it to one of the 10 user slots. Now while you CAN start with and edit ANY of the built in loops, the ones from 94-100 are there to make this easier for you. So if we look closer at the chord progressions numbered 94-100:
We basically have 4 options in 4/4 time (4,8,12 & 16 measure versions) and 3 options in 3/4 time (4, 8 & 16 measure versions). So the idea for creating your own chord progressions is you pick one of these, and then edit it and save it to one of ten user slots. Something important to note though, is that there is no way to add or delete measures; so as a result the longest loop you could make is only 16 measures, so . . . not long enough for a song.
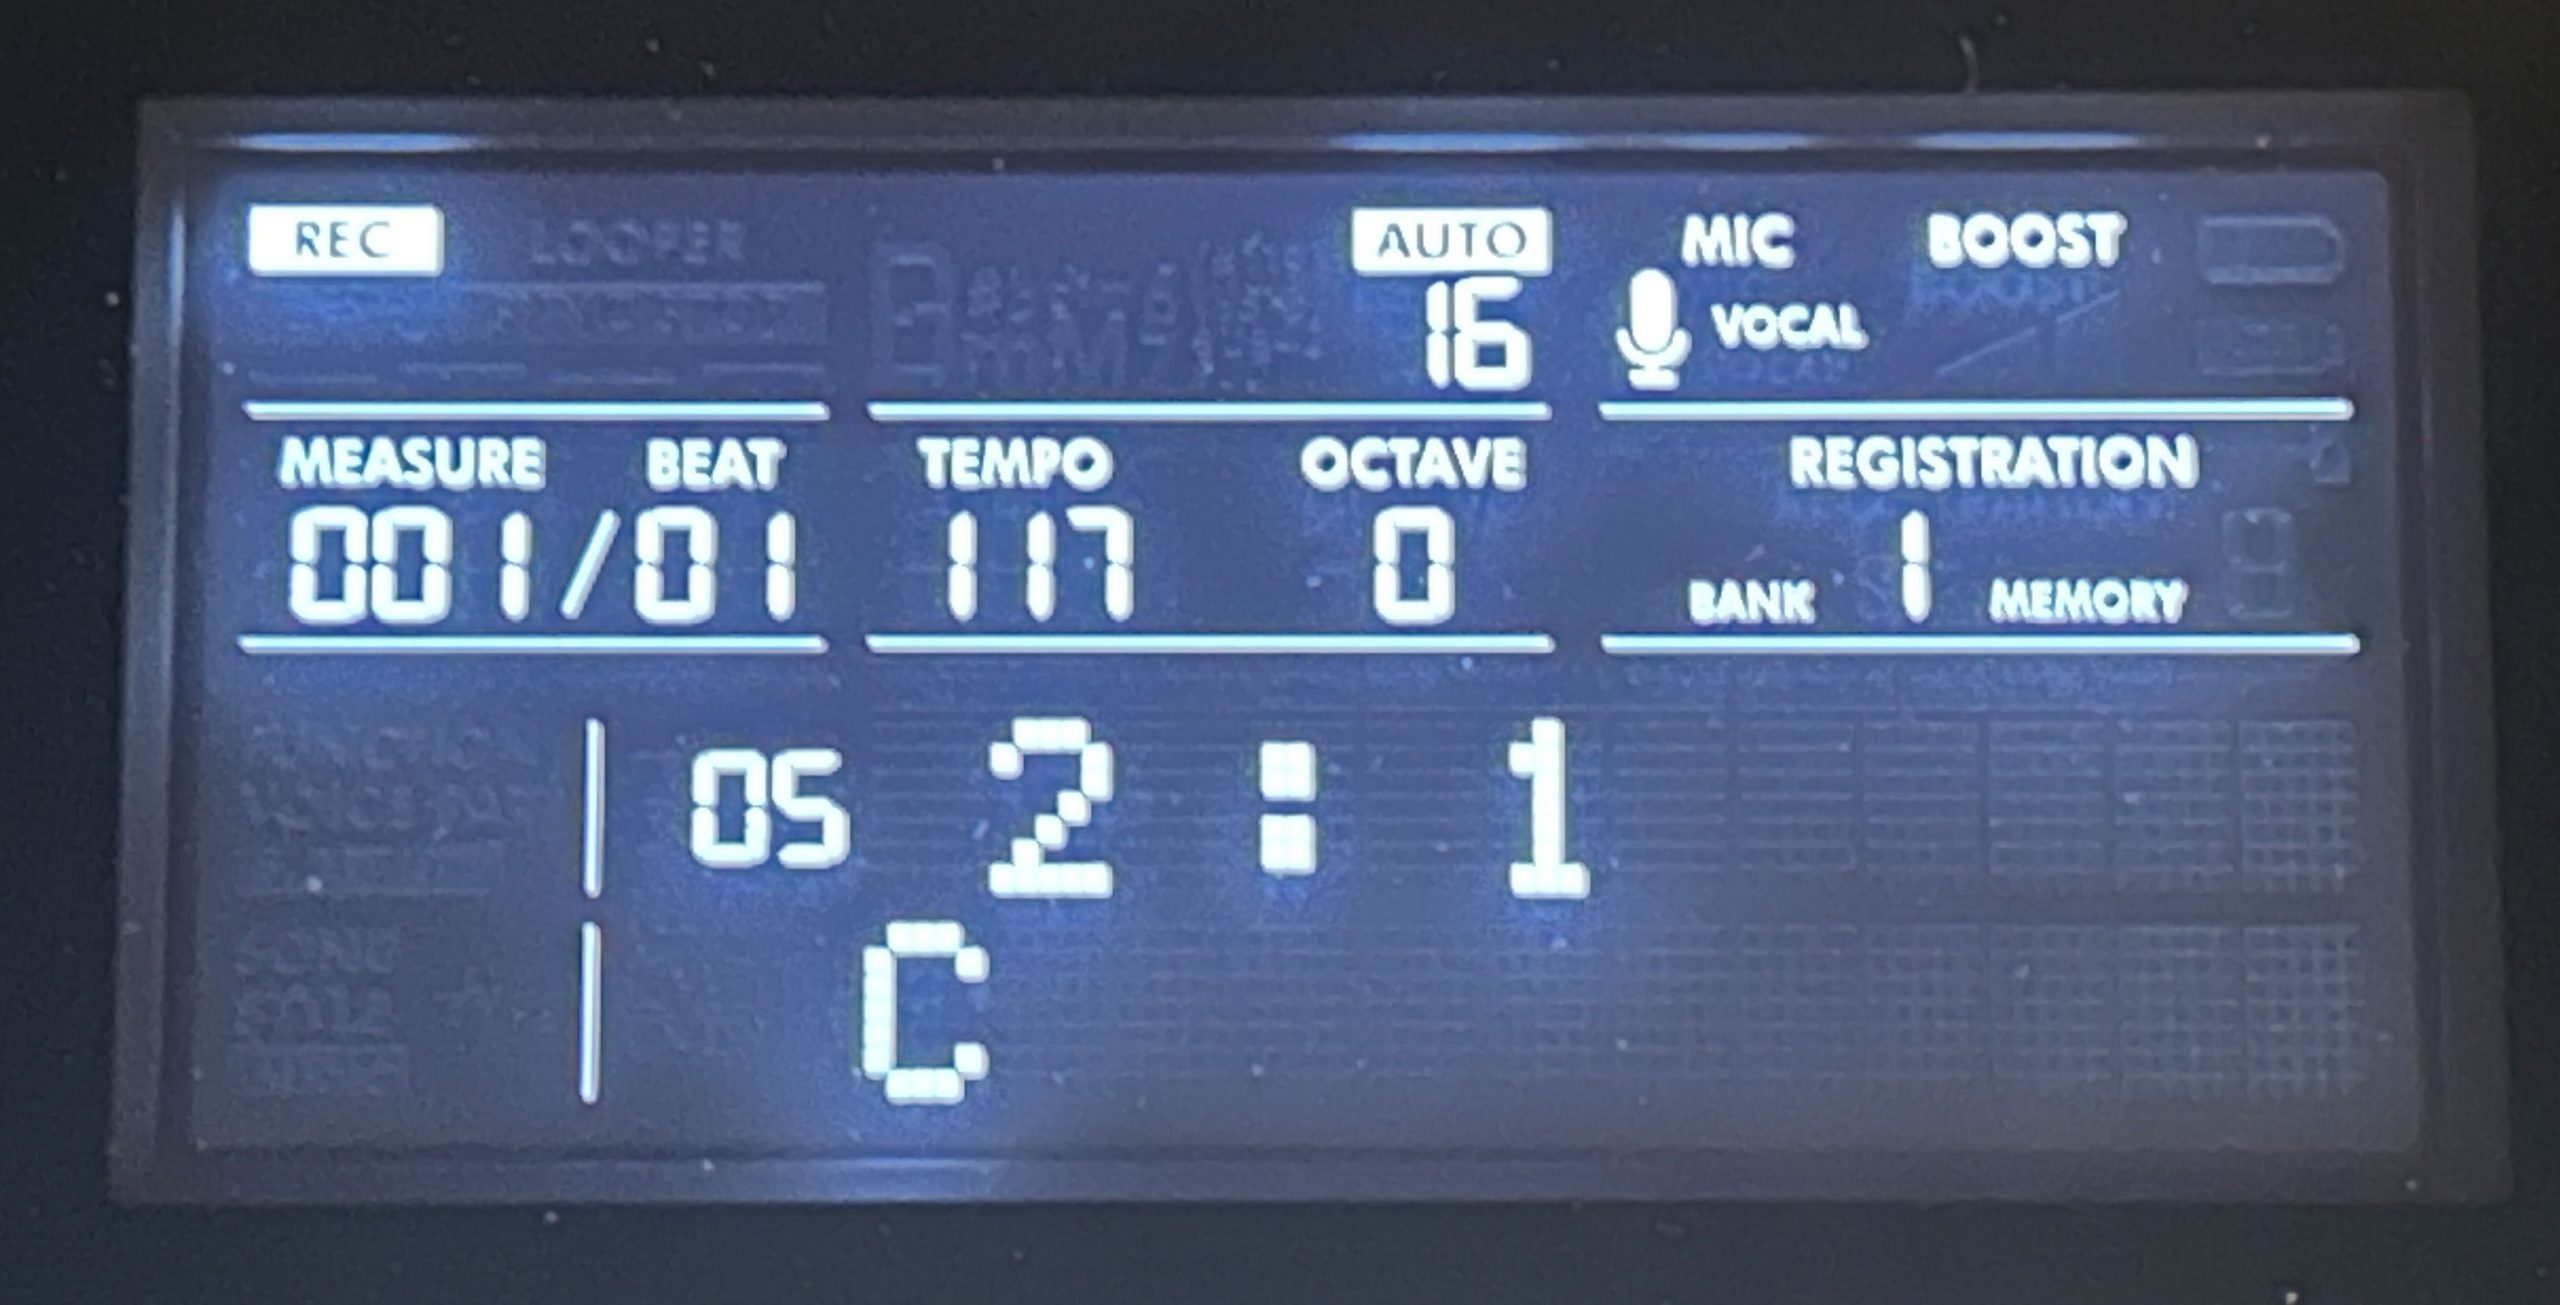
So to edit a loop, navigate to any of the 100 existing ones, let’s say #94, which is the 4 measure 4/4 “empty” one. Then if you hold down the RECORD button and press the SELECT button in the Auto Chord Play section, you’ll be taken into edit mode. Now, you can turn the top dial to move through each beat in each measure (so for example “2:1” will be the second measure, beat 1). To edit the chord you actually finger the chord on the keyboard. So I could change all 4 beats in measure 2 to be a Dm, then all 4 beats in measure 3 to be an Em, and beats 1 and 2 in measure 4 to be an F, and beats 3 and 4 to be a G.
Then to save that, I just need to press RECORD again and then choose one of the 10 user slots. Then I can press PLAY and play along with my new progression. And note I can also use any of the normal accompaniment features; I can switch back and forth between style variations, I could trigger an ending, or an intro etc.
So, as a practicing tool or something to help you test out melodies or solos for your own songs? It’s a great feature, but it’s not very usable for backing tracks. Now just a teaser; I did recently finish filming a deep dive into the “Chord Looper” feature on my Yamaha PSR-SX720; the Chord Looper is basically an advanced version of Auto Chord Play. And in that video, I demonstrate a workaround that would allow Chord Looper to be used to generate a full backing track. Now the same workaround (although there are multiple extra limitations on the E583) MIGHT be usable to help you use Auto Chord Play to generate a backing track (it involves using Auto Chord Play in conjunction with Registration Memory). So keep your eye on my channel for a possible future video on that.
Looper
Ok so the looper is another new feature on the PSR-E483 & E583. The looper basically turns your keyboard into a looper pedal; you can record phrases that replay in a loop, and keep adding to them. There are also some welcome quantize features, AND you can synch your loop up with an existing style so they play in synch. You can only store one loop in the keyboard memory, but you can copy loops to a flash drive so that you can store more, and load in the one you want to use. One of the BIG limitations though, is that you can only use ONE instrument voices in your loop (so ALL of your phrases have to be the SAME voice). That’s actually a big downside in my opinion; when I first heard of this feature, I was hoping you could play a bass guitar phrase, then a guitar phrase, then a keyboard phrase etc. But one of my YouTubers commented on my channel that ….
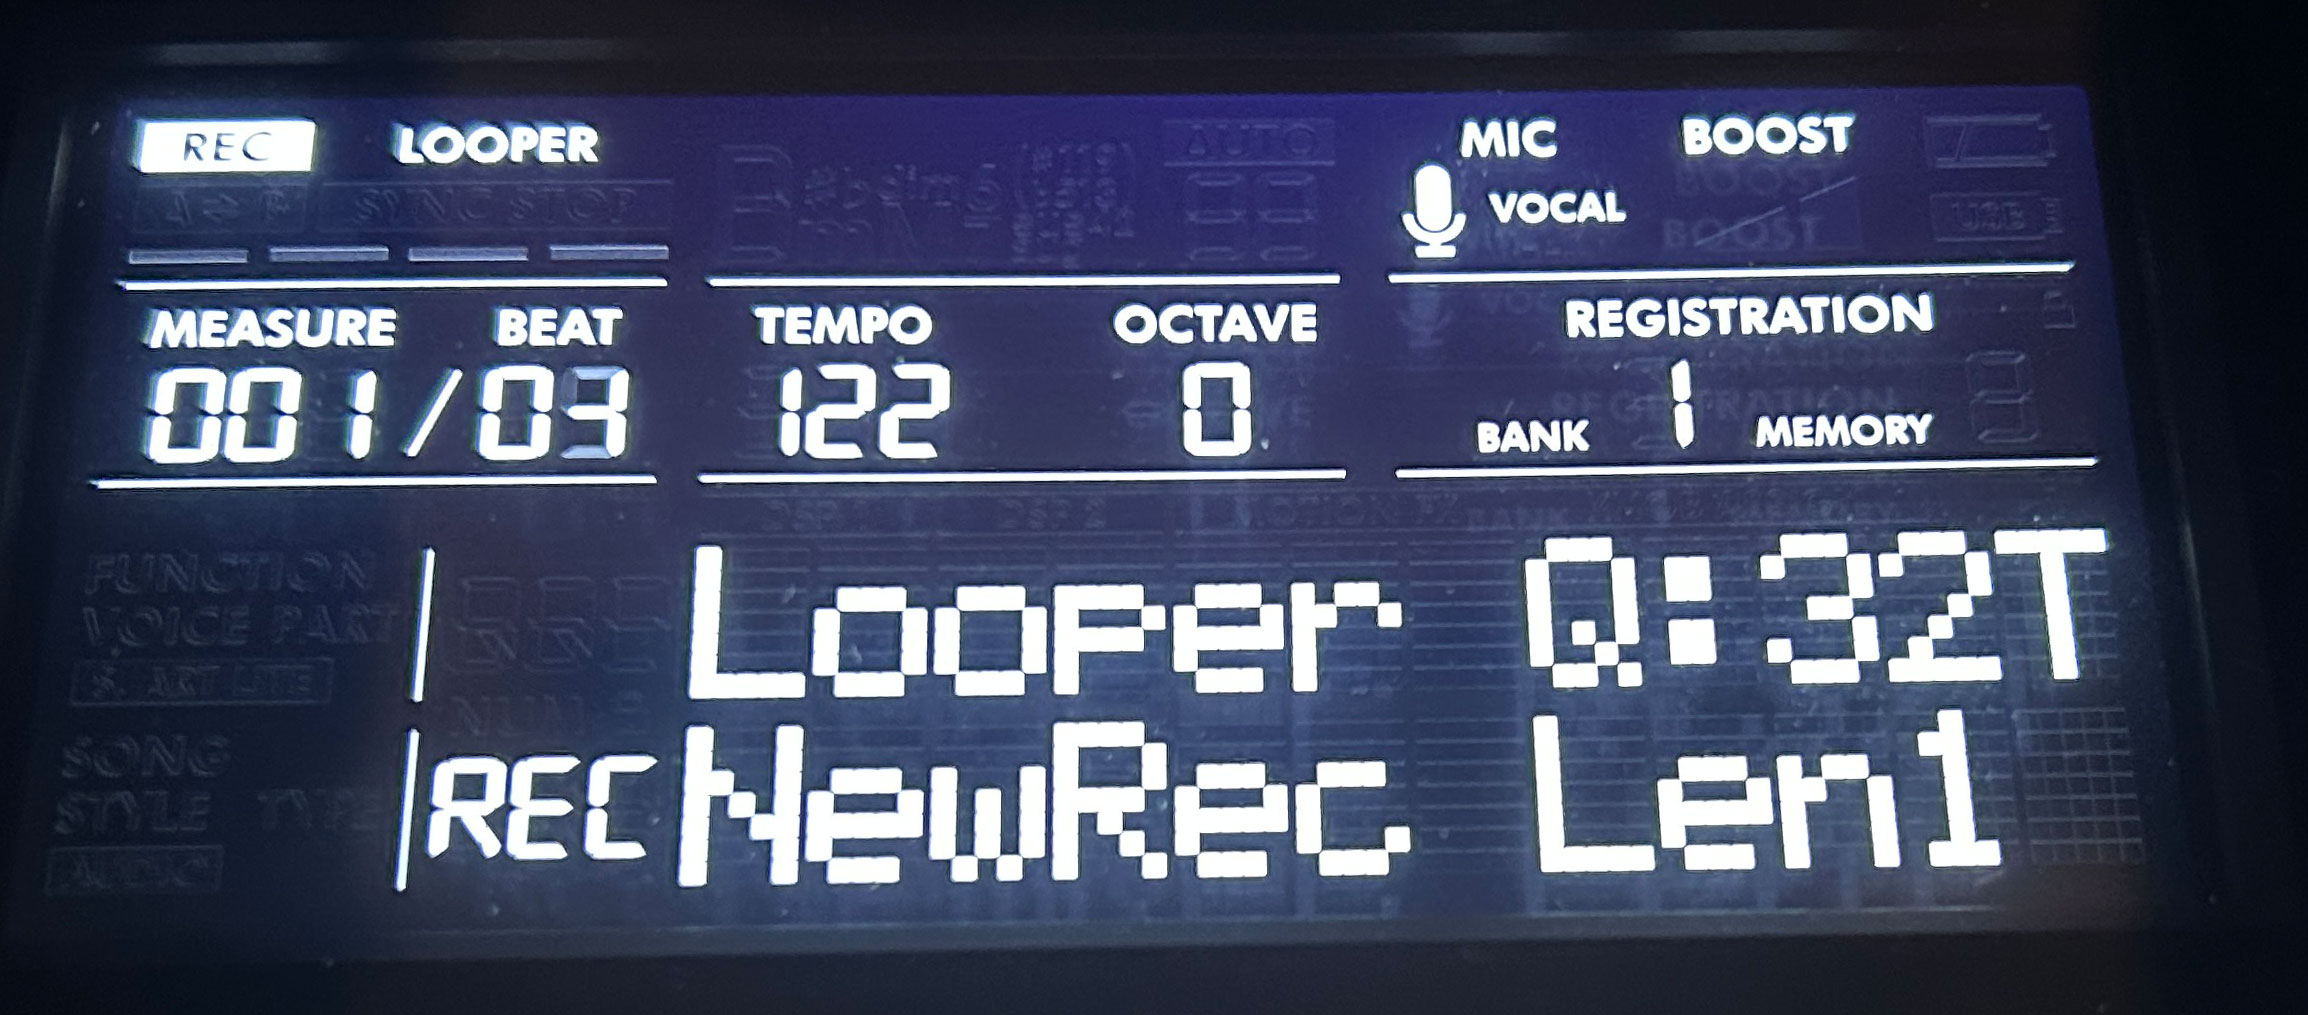
To record a new loop, first select the voice you want to use and then set the tempo (just press the tempo button). Then, hold down REC and press LOOPER; this starts the metronome at the tempo you set. Then we have some settings we can choose before we start: use the top knob to adjust your “Quantize” value; this will help if you play slightly out of time by adjusting your timing to the nearest specified level. The recommended setting for this is the shortest duration note you plan to play (between an 8th note and 32nd, or between 8th and 32nd note triplets – those are the ones with the “T”). Right below that you can set the length in measures of the phrase you plan to play (you can adjust this with the lower knob).
Once you’re ready, just play your first phrase. You’ll hear it repeating, then you can just continue playing and adding phrases. When you’re done, you can press STOP – the menu will now show “LOOPER” at the top to indicate there is a recorded loop available. You can play back your loop by itself by pressing the LOOPER button to start it, and then again to stop it. You can also go back in and continue adding phrases to an existing loop; to do that, hold down REC and press LOOPER again and you’ll be back in edit mode; to start the loop playing again, just press the PLAY button and continue recording phrases. If you make a mistake or add a phrase you don’t like, you can walk it back a note at a time by pressing the REWIND button in the accompaniment section; every press of that button erases the LAST remaining note that you played – FYI: if you play a chord, this does still work, but only one note at a time (so if you played a 3 note chord, you’ll need to hit the REW button 3 times to get all of the notes you played). And, if you erase too many notes, you can restore them by using the FF button in the same way.
So once you have a loop recorded, you can actually synch it up with a style (even at a different tempo); to do that, first select your style and set the tempo, then hold SHIFT and press LOOPER – the LOOPER text on screen will start flashing. So you could even enable accompaniment and set synch start and then just start playing and you will hear your loop in synch along with the normal accompaniment. Keep in mind though, that any chord changes in your loop will NOT affect the accompaniment, so if you have chord changes in your loop, you will still have to manually trigger those once the style is playing.
To offload a loop to a flash drive, insert the drive and hold SHIFT while pressing FUNCTION to enter the “File Control” menu. Scroll to #8 “Save Looper”; choose one of 100 available looper slots, and then hold SHIFT and press YES to execute the copy, and YES again to confirm. You can follow the same process (choosing “Load Looper” this time) to load a loop back INTO the keyboard memory when you want to use it. To erase the current loop stored on the keyboard, hold CLEAR and press the LOOPER button.
So while it is a bit limited since you can only use a single voice, this still does allow you to add a little something to the style playback. And another interesting application for this would be to add some extra percussion to a style by using one of the built in drum kit voices as your voice for the loop. For this to be useful, you’d need to record the loop at the same tempo as the style you intend to use it on, so that you could turn the loop on and off when you want while the style is playing so they stay in synch. I might do a deeper dive video into this in a bit more detail on my channel so stay tuned for that.
Registration Memory
Ok this is an area that I was REALLY hoping to see an upgrade on with the PSR-E483 and E583 from the prior models, but unfortunately that didn’t happen. So we are still limited with only having 32 registration memory slots, and we also still access them in the same way; choose a bank from 1-8 and then use the buttons to choose from the 4 slots within that bank. The Casiotone CT-S500 has 64 slots, and the Roland GO:Keys 3&5 have 256 slots that are also nameable, so Yamaha is really lagging behind the competition in this area.
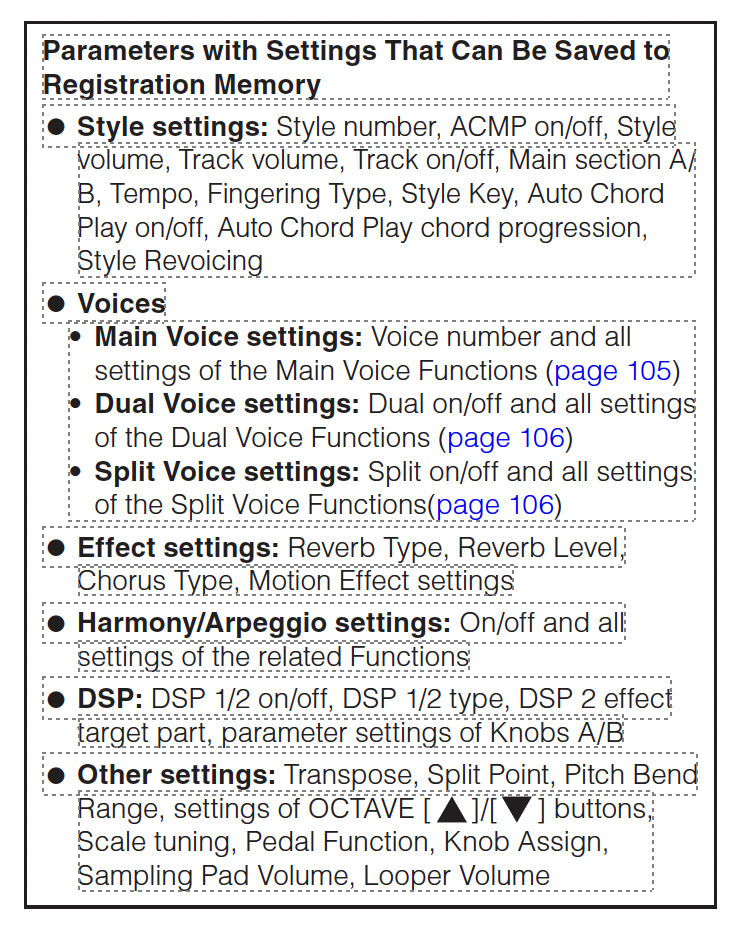
Now the keyboard actually does come with all the registration memory slots already populated, but to be honest I never even look at those, I just overwrite them with my own. So given that there are a limited number of slots available, and that you can only QUICKLY switch between 4 (using the buttons) you may need to plan out your registrations a bit to try and organize them to best meet your needs. So to store a registration, once you’ve set up everything the way you want it (so your voices, style, effects and any other settings) then navigate to the bank you want by using the BANK button, then to save it in one of the 4 slots in your chosen bank, just hold the BANK button while you press one of the 4 slot buttons. You’ll see your current bank displayed on screen, and while it’s saving, the memory slot number will flash then turn solid. NOTE: when overwriting a bank, you do NOT get any kind of confirmation “Are you SURE?” screen; it will immediately overwrite it.
So what gets saved and what doesn’t when you save a registration memory slot? Here is a snapshot from the reference manual listing what gets saved:
Connectivity

Ok so for connectivity, the PSR-E483 is awesome, and the PSR-E583 is even better. Starting with what’s common on both, we have:
PSR-E483 & PSR-E583:
- 1/4″ headphone port
- 1/4″ sustain pedal port
- Proper 1/4″ left and right line out ports for connecting to external audio equipment
- 1/8” audio in port for streaming in external audio from a device
- 1/4″ dynamic mic input with gain and effects
- USB flash drive port for extra storage & transferring files
- USB to host port which thankfully DOES still include a built in audio interface (NOTE: this has been upgraded to USB-C from the prior models which had USB-B); the audio interface sends high quality digital audio in BOTH directions to & from a device, which adds a bunch of super useful functionality:
- you can send audio from your keyboard to a device running a DAW app like GarageBand to record an audio track
- you can send audio from your keyboard to a phone to record a performance video with high quality audio (your phone’s camera app will use the direct audio instead of it’s built in mic)
- you can stream external audio in from a device (backing tracks, YouTube etc)
- if you want to trigger external sounds on a VST sound bank app on a device using MIDI, the sounds generated by that app will come back through to the keyboard’s speakers, headphones and output without any lag
PSR-E583 Only:
There’s been a HUGE new addition in connectivity on the PSR-E583 (which in my opinion justifies going with the E583 vs. the E483 all by itself) and that is a 1/4″ “Foot Controller” port for an expression pedal. It was pretty frustrating not being able to control volume with a pedal on my PSR-EW425. Note that volume control is your ONLY option for this pedal; that’s fine for most users, and it’s also good that Yamaha allows you to specify whether the volume applies to EVERYTHING (so your styles etc) or JUST to your keyboard sounds. This is a fantastic addition.
There is no BlueTooth functionality on the new models; I personally don’t care about BlueTooth MIDI (I would never use that anyways), but BlueTooth audio in would have been a nice addition. But overall, the connectivity on these models is awesome, ESPECIALLY the PSR-E583 with the addition of that expression pedal port.
Quick Sampling
The PSR-E483 and PSR-E583 are both equipped with some basic sampling functionality. You can sample audio from the mic input, or any of the audio in sources (so that includes the 1/8″ aux input, or sounds from a device connected to the USB-C port). Samples have a maximum length of about 9 seconds, and you only have the ability to store 4 samples at a time. Then you can trigger the sounds using the 4 pads (A to D). And you can also loop the playback if you want, so it repeats over and over, and you can loop all 4 samples if you want to. The keyboard comes with 4 samples built in; when you record over top of one of them, you can always delete your sample and that button will revert to the built in sample.
This feature was also on my PSR-EW425, and to be honest I never used it, and I don’t see myself using it on the PSR-E583 either, but if this is something that interests you, it is there. So to record a sample, press the CAPTURE button; you’ll be asked which slot to record, so press A-D; then the screen will prompt you to start recording – you can press the slot button again to start recording. Then you can either say something into the mic, or play your external audio source, then press the slot button again to stop the recording; any silent audio before or after your recording is supposed to be sensed and automatically deleted (at least from memory, this actually seems to work better than it did on my PSR-EW425). Then you can replay it by hitting the button, or loop it by holding LOOP and pressing the slot button (and press the slot button again to stop).
Now SUPPOSEDLY, you can synch your sample to the keyboards tempo, but to be honest, I haven’t had much luck with that, even with the built in loops. But to try that, you need to hold SHIFT and press CAPTURE; then you can turn synch to on. Now if you press your sample button, it WON’T play unless a style is playing. Once you start a style, you can hold LOOP and press your button and it will TRY to play your sample in time. To delete your sample and revert back to the built in sample, you have to be in capture mode, then hold CLEAR and press your sample button.
So I can see this being useful for one time sound effects, triggered manually if that’s something you’re into, but the looping (at least to me) doesn’t seem super useful.
Recording
The PSR-E483 & E583 can record in audio format, or multi-track MIDI.
Audio Recording
Audio recordings are SUPER easy to do; they are stored on a flash drive, so you need to have one inserted. And the cool thing about the audio recordings is that it includes EVERYTHING YOU HEAR; so not only your playing and any accompaniment, but it will also include the mic input if you’re using it, and any audio being streamed into the keyboard from a flash drive, or an external device via the 1/8″ aux in OR a USB connection.
Just hold SHIFT and press REC to go into audio recording standby mode (you’ll see the REC indicator on screen). Then you press REC again to start recording (you’ll see a timer in the bottom right of the screen), and REC again to stop. If you want to listen back right away, you can just press PLAY.
To play an audio recording (or any compatible song file) back from your flash drive without first having gone through the recording process, you need to hold SHIFT and press the small SONG button over on the RIGHT side of the keyboard (if you press the main SONG button in the accompaniment section it will ONLY take you to MIDI recordings, not audio which is a bit strange).
So if you wanted to, you could actually record over an existing audio recording and save it to a new file. I’ll eventually be doing a deep dive videoi into audio recordings, so stay tuned to my channel for that.
Multi-Track MIDI Recording
You can record up to 10 multi-track MIDI songs on the PSR-E483 & E583; these ones are stored by default in the 10 user slots available in the keyboard’s memory. You can also export these MIDI files to and from a flash drive. There are 6 tracks available for recording (numbered 1-5 and then the 6th is “A”); track A is reserved for the accompaniment, the other tracks can include any voice you like, including additional drums from one of those voices. So if you’re going to include accompaniment in your recording, you CAN record it as well as ONE voice that you’re playing in your other hand, but my recommendation would be: just record the accompaniment first, so you can concentrate on your changes in style variation, fills etc. And THEN you can start adding additional tracks on top of the accompaniment.
Now there is WAY too much to talk about here, so I’m only going to do a very quick and basic demo in this video. So just as a quick example; if you pick a style, mute a style part you don’t like, and choose a voice then press RECORD – the screen will indicate you’re in record standby mode; so you could enable accompaniment and an intro for example, then just start playing (the recording will start automatically); once you’re done, you can hit STOP. Then, you’ll see the Track A button is lit up (indicating there’s data there – you’ve recorded some accompaniment), but if you played along, you’ll ALSO see track 1 is lit up; that’s whatever you played in your left hand. So you can hit PLAY and listen to what you’ve got so far. Then to add another track, you could choose any other voice you like, hold RECORD and press the track you want to record that voice in. Then if you play that back, you’ll now hear everything together.
There is some editing ability available, but it is a bit limited. You can delete an entire track and re-record it, but there is no “punch in/punch out” functionality to just re-record a small section where you made a mistake; you’ll have to re-record that entire track start to finish. There are also some tricks and workarounds you can do to insert custom intros and endings if you like. I will DEFINITELY be doing a deep dive video (or possibly videoS) into all of the multi-track recording features on the PSR-E583, including using the multi-track recorder to create your own backing tracks; so stay tuned to my channel for some deep dive videos on recording!
Other Features
Portability
Both the PSR-E483 and PSR-E583 are easily portable; they both only weigh about 16 pounds, so they are pretty easy to move around, and they can both be operated on batteries. But compared to the competition, they are bigger, bulkier and heavier. As an example, the Casiotone CT-S500 dimensions are 36″ wide X 10.5″ deep and only 3.5″ high, and it weighs under 10 lbs. When the PSR-E383 came out (replacing the PSR-E373) Yamaha did trim that model down in size a bit, so I WAS expecting a similar adjustment on the E483 & E583, but they stayed exactly the same as their predecessors.

- Width: just over 39″
- Depth: almost 16″ (this is actually REALLY deep; I use keyboard stands that have vertical arms at the back, and the PSR-E583 actually takes up the entire depth of my stand)
- Height: 5.5″ (this is also super thick & bulky)
So are these models bulkier and heavier than the competition? Absolutely; BUT they are still easily portable. And a bigger case does also provide lots of room for more direct access buttons, and as a result . . . a much better user interface than the minimalistic competition, so to be honest? I’m totally fine with that compromise.
Speakers
The speakers on the Yamaha PSR-E483 are 12 watts total, and the PSR-E583 are 24 watts total, and the speaker dimensions are identical on both models at 12 x 2 cm. I owned a PSR-EW425 for a couple of years, and the speakers on it were the identical specs as the PSR-E583, and I absolutely LOVED those speakers. I wish I still had the EW425 to compare directly to the E583, because the E583’s speakers sound even better to me; but, that’s only from memory, so I’m probably wrong there. But either way, these speakers are super loud, clear and don’t distort even at max volume, and you could easily use these without external amplification to jam at acoustic jams, or to perform at a small, quiet venue like a cafe. And for larger & louder gigs where you are connected to an amp and(or) PA system, these speakers provide a decent set of monitors aimed right at the player. As far as the 12 watt speakers go on the PSR-E483, that model isn’t available where I live, so I won’t be able to demo it, but assuming they’re the same or close to the PSR-E473’s 12 watt speakers, they’re nowhere near as good as the E583’s, but still much better than the weaker speakers on the competition.
Here’s a quick demo of the speakers on the PSR-E583 just as picked up by the internal mic on my iPhone.
The Competition
Yamaha PSR-E483 ($400 USD) vs. PSR-E583 ($490 USD)
Strange first comparison? Maybe, but I wanted to compare these two models first, because if the PSR-E583 IS available where you live, then I would NOT recommend buying the PSR-E483 JUST to save $90USD! An expression pedal port, modulation wheel, speakers that are twice as powerful and 30 extra voices are MASSIVE value for that $90! Now if the PSR-E483 IS your only option where you live? Then in the comparisons below, just remember the features the E483 is missing.
Casiotone CT-S500 ($450 USD) vs. Yamaha PSR-E583 ($490 USD)
The Casiotone CT-S500 is a pretty cool keyboard as well; it is also a 61 key arranger with lots of sounds and styles and some good connectivity. But there are a LOT of differences between these 2 keyboards, that might sway your opinion one way or the other.
- Key Action: This is probably the single biggest difference; the CT-S500 has piano style box shaped keys as opposed to the PSR’s synth style diving board keys. And, the CT-S500 keys offer quite a bit more resistance (almost a semi-weighted feel) so if you’re mostly a piano player, you might prefer this action since it is more “piano-LIKE”
- CT-S500 Pro’s:
- Portability: The CT-S500 is RIDICULOUSLY portable; it is FAR less thick, wide and bulky as the PSR-E583, and it only weighs 10 pounds! (as opposed to the PSR-E583 at over 16 lbs!)
- Registration Memory: 64 registration memory slots vs 32 on the Yamaha
- Connectivity: the CT-S500 includes a BlueTooth dongle that provides BlueTooth MIDI and BlueTooth audio in
- Style Features: The CT-S500 has more chord detection modes including full keyboard chord detection
- Yamaha PSR-E583 Pro’s:
- Connectivity: The PSR-E583 has a mic input with effects, a modulation wheel, and an audio interface built into the USB port (the CT-S500 has none of these features; note that both keyboards have an expression pedal port, the PSR-E483 does not, nor does it have the mod wheel)
- User Interface: Way more direct access buttons & a bigger screen (MUCH less menu diving than the “minimalist” design of the CT-S500)
- Speakers: There is no comparison here; the PSR-E583 has 24 watts (and the E483 has 12 watts); the CT-S500 only has 5 watts total
- Style Features: You can mute and even re-voice individual style parts, on the CT-S500 your only option is all accompaniment or drums only. Also, the styles on the Yamaha are better programmed and smoother sounding on transitions
- Other Features: The Yamaha has the Auto Chord Play feature, Quick Sampling, and better (and easier) multi track recording functionality
In my opinion, the only reasons to go with the CT-S500 over the PSR-E583 would be if a more “piano-LIKE” key action, portability and(or) more chord detection modes were REALLY important to you. Otherwise I think the user interface, speakers, mod wheel and audio interface make the Yamaha PSR-E583 a better choice.
Roland GO:Keys 5 ($550 USD) vs. Yamaha PSR-E583 ($490 USD)

The Roland GO:Keys 5 is another competitor for the PSR-E583 (although this one is a bit more expensive than the Yamaha . . .). This is also a 61 key arranger, but the feature set on the Roland does come much closer to the PSR-E583 than the Casiotone does.
- Key Action: Once again, this is probably the single biggest difference; like the CT-S500, the GO:Keys also has piano style box shaped keys as opposed to the PSR’s synth style diving board keys. And, the GO:Keys 5 keybed ALSO offers quite a bit more resistance (almost a semi-weighted feel) so if you’re mostly a piano player, you might prefer this action since it is more “piano-LIKE”
- GO:Keys 5 Pro’s:
- Portability: As with the CT-S500, the GO:Keys 5 is also super portable compared to the Yamaha. It’s also a lot less thick, wide and bulky, and it only weighs 11 pounds! (as opposed to the PSR-E583 at over 16 lbs!)
- Registration Memory: 256 registration memory slots vs 32 on the Yamaha, AND the slots are nameable!
- Connectivity: BlueTooth MIDI and BlueTooth audio in are built right into the keyboard
- Style Features: WAY more chord detection modes including full keyboard chord detection, and more variations are available
- Voices: There are quite a few more voices; over 1100 compared to 890 on the PSR-E583
- Other Features: The Roland’s Chord Sequencer is MILES more advanced than the Auto Chord Play on the Yamaha; you can EASILY make a complete backing track (BUT: I’m not a fan of the styles on the Roland, so I never actually used this which is a shame). And you can add voices and styles to the Roland using Roland Cloud.
- Yamaha PSR-E583 Pro’s:
- Connectivity: The PSR-E583 has a modulation wheel
- User Interface: Way more direct access buttons & a bigger screen (MUCH less menu diving than the context sensitive screen on the Roland)
- Speakers: There is no comparison here; the PSR-E583 has 24 watts (and the E483 has 12 watts); Roland’s wattage is “a big secret” and isn’t published; but the speakers can distort at high volume and are PROBABLY around 5 watts like the Casiotone
- Style Features: You can mute more detailed style parts than on the Roland, and the Roland cannot re-voice style parts. Also, the styles on the Yamaha are better programmed and smoother sounding on transitions, and while it does depend on your personal tastes, for me the style options are FAR better on the PSR; way more standard rock and blues options
- Recording: The GO:Keys has no multi track recording features; the Yamaha’s are actually not bad at all
So as far as which one is better for you? Once again, if a “piano-LIKE” key action, lots of registration memory, chord detection modes and(or) portability are SUPER important, the Roland is the best choice, but for me? I think that the speakers, mod wheel, style quality and user interface on the Yamaha make it a better choice, and while the action IS light, I find it to be super responsive and fun to play.
Yamaha PSR-EW425 ($490 USD) vs. Yamaha PSR-E583 ($490 USD)

So what about the prior model? Especially if you start to see EW425’s on sale, which is the better choice? I owned a Yamaha PSR-EW425 for a couple of years, and I LOVED IT! BUT compared to the E583? That’s an EASY choice for me, and I would choose the PSR-E583 every time. Even though I do miss the extra 15 keys (and if Yamaha had released a 76 key version of the E583 I WOULD have bought that instead), the user interface, menu screen and expression pedal port are big enough upgrades that I would never choose the EW425 over the E583. If those features aren’t that important to you and you really want the extra keys, then I’d recommend watching for sales!
Yamaha PSR-E483 & PSR-E583: The Verdict
The verdict is easy on these keyboards is easy – ABSOLUTELY FANTASTIC!
In my opinion, if having fully weighted keys isn’t super important to you, then the Yamaha PSR-E483 and especially the PSR-E583 are 2 of the best value keyboards on the market today. Other than not having weighted keys, these 2 keyboards include pretty much EVERY other feature I can think of, and then extra ones like the mic input with gain and effects.
- Great quality & selection of sounds, especially piano, electric piano and organ
- Good user interface: a much improved menu screen, lots of backlit quick access buttons for important things like octave shifting, transposing, splitting and layering etc that minimize menu diving
- Light but super responsive action, most importantly with consistent and predictable dynamic control
- Mic input with gain and effects
- L/R line out ports (important for recording and performing, and also allows the speakers to be enabled as monitors while connected to external amplification)
- Amazing 24 watt speakers on the PSR-E583, and really good 12 watt speakers on the PSR-E483
- A great selection of well programmed rhythms and accompaniment, with ability to mute & and(or) re-voice style parts
- Decent portability: not too heavy and the ability to run on batteries (but heavier and bulkier than the competition)
- Audio in options for streaming backing tracks that have well balanced and configurable volume levels (these keyboards have 2 options: the audio in port or playing tracks from a flash drive)
- Built in audio interface for easily recording piano videos with high quality audio, or to send high quality audio to a device directly without needing an external audio interface
- Ability to record high quality audio direct to a flash drive for easy transfer to a pc for editing
All of that for $490 USD? The PSR-E583 is great value for money!
So as long as you’re not wanting a fully weighted key action?
I can HIGHLY recommend the Yamaha PSR-E583!
(and if the E583 isn’t available in your area, the E483 is still a great choice)
Thanks so much, and happy keyboard playing! (and keyboard shopping 😉 )
Check out current pricing in your area:
Piano Training I Recommend
I’ve taken a number of online piano courses and tried various piano learning apps; the ones I’m listing here are my favorites and I can highly recommend any of these if you are looking for some online training to get started on learning piano, or to take your current skills to the next level.
Bird’s Piano Academy is one of my absolute favorite online piano programs. Arthur Bird has created multiple courses on getting started learning piano quickly as well as great intro courses on Blues, Jazz and more. And his courses are chord based, so you don’t have to read sheet music which is AWESOME and definitely the fastest way to learn to play modern music. You can go with a subscription that includes ALL his courses, or you can buy individual courses a la carte with LIFETIME access – HIGHLY RECOMMENDED!
If you’re looking for the least expensive way to get started on piano, Pianoforall is a great option. It’s a unique course created by Robin Hall that uses downloadable eBooks with embedded videos and audio instead of a website.
This course is an amazing option for learning piano from beginner up to being able to perform; it teaches multiple genres of music and focuses on how to be a “one person band” on the piano. This course is taught by pro pianist Steve Lungrin – Steve has been teaching and performing his whole adult life and is a fantastic instructor and performer.
I took this course from 2020 to 2021 and it elevated my playing from a very basic level to being able to play songs in multiple genres.
I was super excited when Simply Piano added the “Chords Path” to their super popular piano training app (iOS or Android); this path allows a new student to get started learning piano using a chords based approach (which I HIGHLY recommend over a traditional approach). Learning to play using chords is by far the easiest and fastest way to learn to play modern songs (MINIMAL sightreading ability is needed). I did the entire chords path, and can highly recommend that you check it out (you will get a trial period so why not?)
This is a fantastic option if you are mostly interested in rock music. This course was created and is taught by Marine Lacoste, who is not only a fantastic instructor & pianist, but she is also a very accomplished hammond organ player – she performs regularly with her own band, as well as playing keys regularly for multiple recording artists on tour. I started this course in 2023 when I joined a band, and it is helping me greatly in taking my playing to a new level. And Marine is constantly adding new content, and is very active on the platform.
If you sign up for Online Rock Lessons yearly subscription, use code PIANOTONE at checkout to let Marine know I referred you, and she will give you some free bonuses!
This is a fantastic (but pretty unique) online program for taking your piano and organ playing skills to the next level, developed by pro piano, keyboard & Hammond organ player Mike Little. Mike shares tips & tricks accumulated from over 30 years of pro touring, gigging, studio & production experiences. This course isn’t for a COMPLETE beginner, but you don’t have to be a super accomplished player either, to get TONS of value from this program!

Ultimate Piano isn’t an actual course to learn how to play, but it IS a really helpful TOOL for piano students. You connect your keyboard to your computer, go to Ultimate Piano’s website (so NOTHING to install!) and you have a ton of helpful training and exercises at your disposal, as well as built in piano sounds. With the help of on screen light up keys, you can learn and practice scales, chords and even ear training and you can play along with MIDI or audio files, and even YouTube videos to practice songs!