This is my review on the Z stand with the optional 2nd tier from Liquid Stands.
So when you are looking at different stands on Amazon or anywhere else online, you need to be aware that while a LOT of these stands may LOOK very similar – they are NOT all the same.
Liquid Stands vs. Similar Looking Other Brands?
A few months ago, I bought a Z stand from Amazon from a cheaper brand, that at the time I THOUGHT looked pretty much the same as the Liquid Stands model I was considering, and I did a review on that stand.
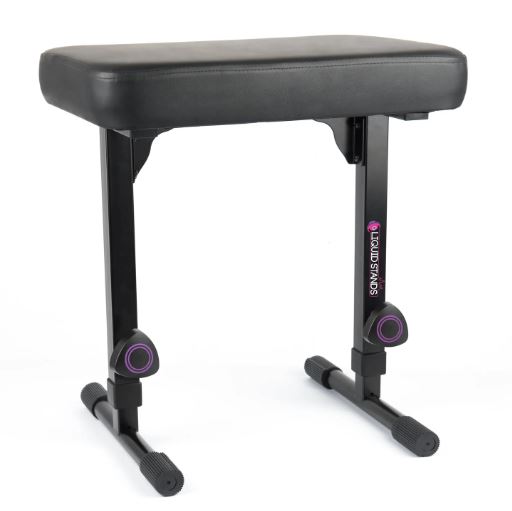
Later on, I was shopping for a new piano bench, and had been considering one from Liquid Stands for some time – it was more money than ANY of the other benches I’d tried before, but since . . . . I hadn’t found a bench I was happy with yet, I decided to give it a try, and as I mentioned in my review on that bench? . . . WORTH EVERY PENNY! That bench is fantastic.
So Liquid Stands actually noticed my review on their bench and reached out to me; as we messaged back and forth about their products I was curious, and . . . actually asked if their stand was the same as the other stand I bought, and they said DEFINITELY NOT, and that they would like to send me one of their Z stands (in my favorite colour . . .purple) as well as their 2nd tier so that I could test it out, do a review (good or bad) and possibly even compare it to my other stand. Well, given how well made the Liquid Stands bench is, I was pretty curious to take them up on their offer, so, thanks a bunch to the good people at Liquid Stands for sending this stand to me, it’s much appreciated, but I will be giving my complete honest opinion on their stand in this review (and FYI, that’s EXACTLY what Liquid Stands told me to do as well; they are super nice people to deal with, and they have a lot of pride in their products). So with all of THAT out of the way . . . . Let’s check out the Liquid Stands Z stand and 2nd tier!
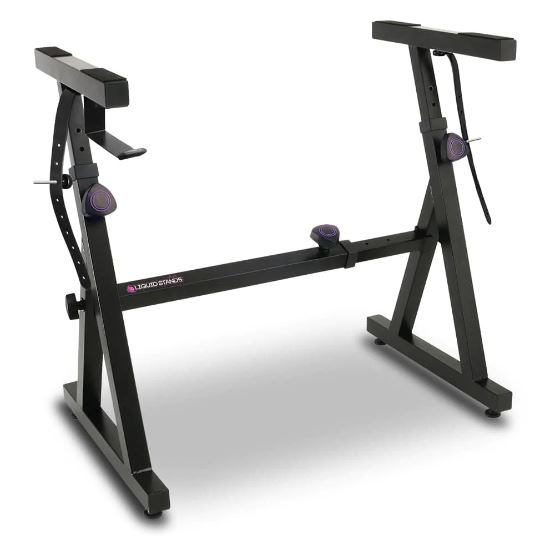
Liquid Stands Z-Stand
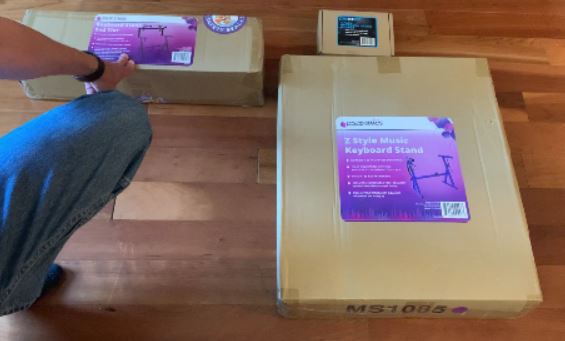
Ok so the Liquid Stands Z stand is available as a single tier or you can get the 2nd tier as well if you wish, and you can also order it with or without wheels. The main stand is currently available in black, as well as purple, chrome and light blue. And I actually do have the wheels, but won’t be putting them on because the stand is on my hardwood floor. Now I did film the assembly of the stand, if you want to watch that, here is a link to that video.
What I will say about the assembly though, is it was SUPER simple to put together. Everything was really well packaged, and the stand and the separately packaged 2nd tier both had super clear easy to follow instructions with colour pictures, and all the parts were clearly labelled, so it only took a few minutes to put together (and . . . the assembly process was SIGNIFICANTLY easier and smoother than the other stand I bought).
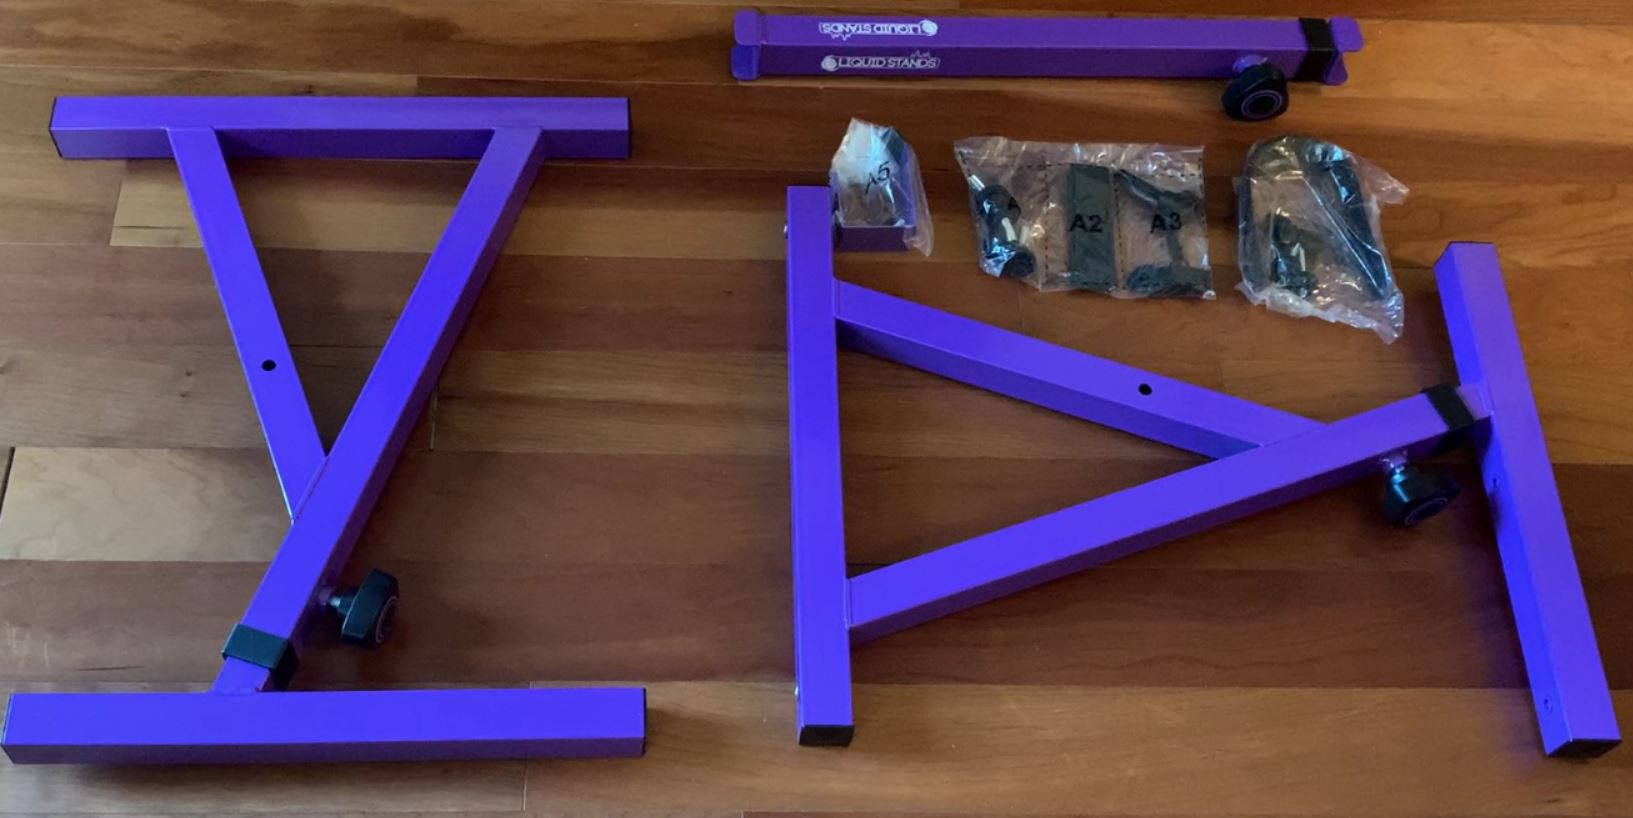
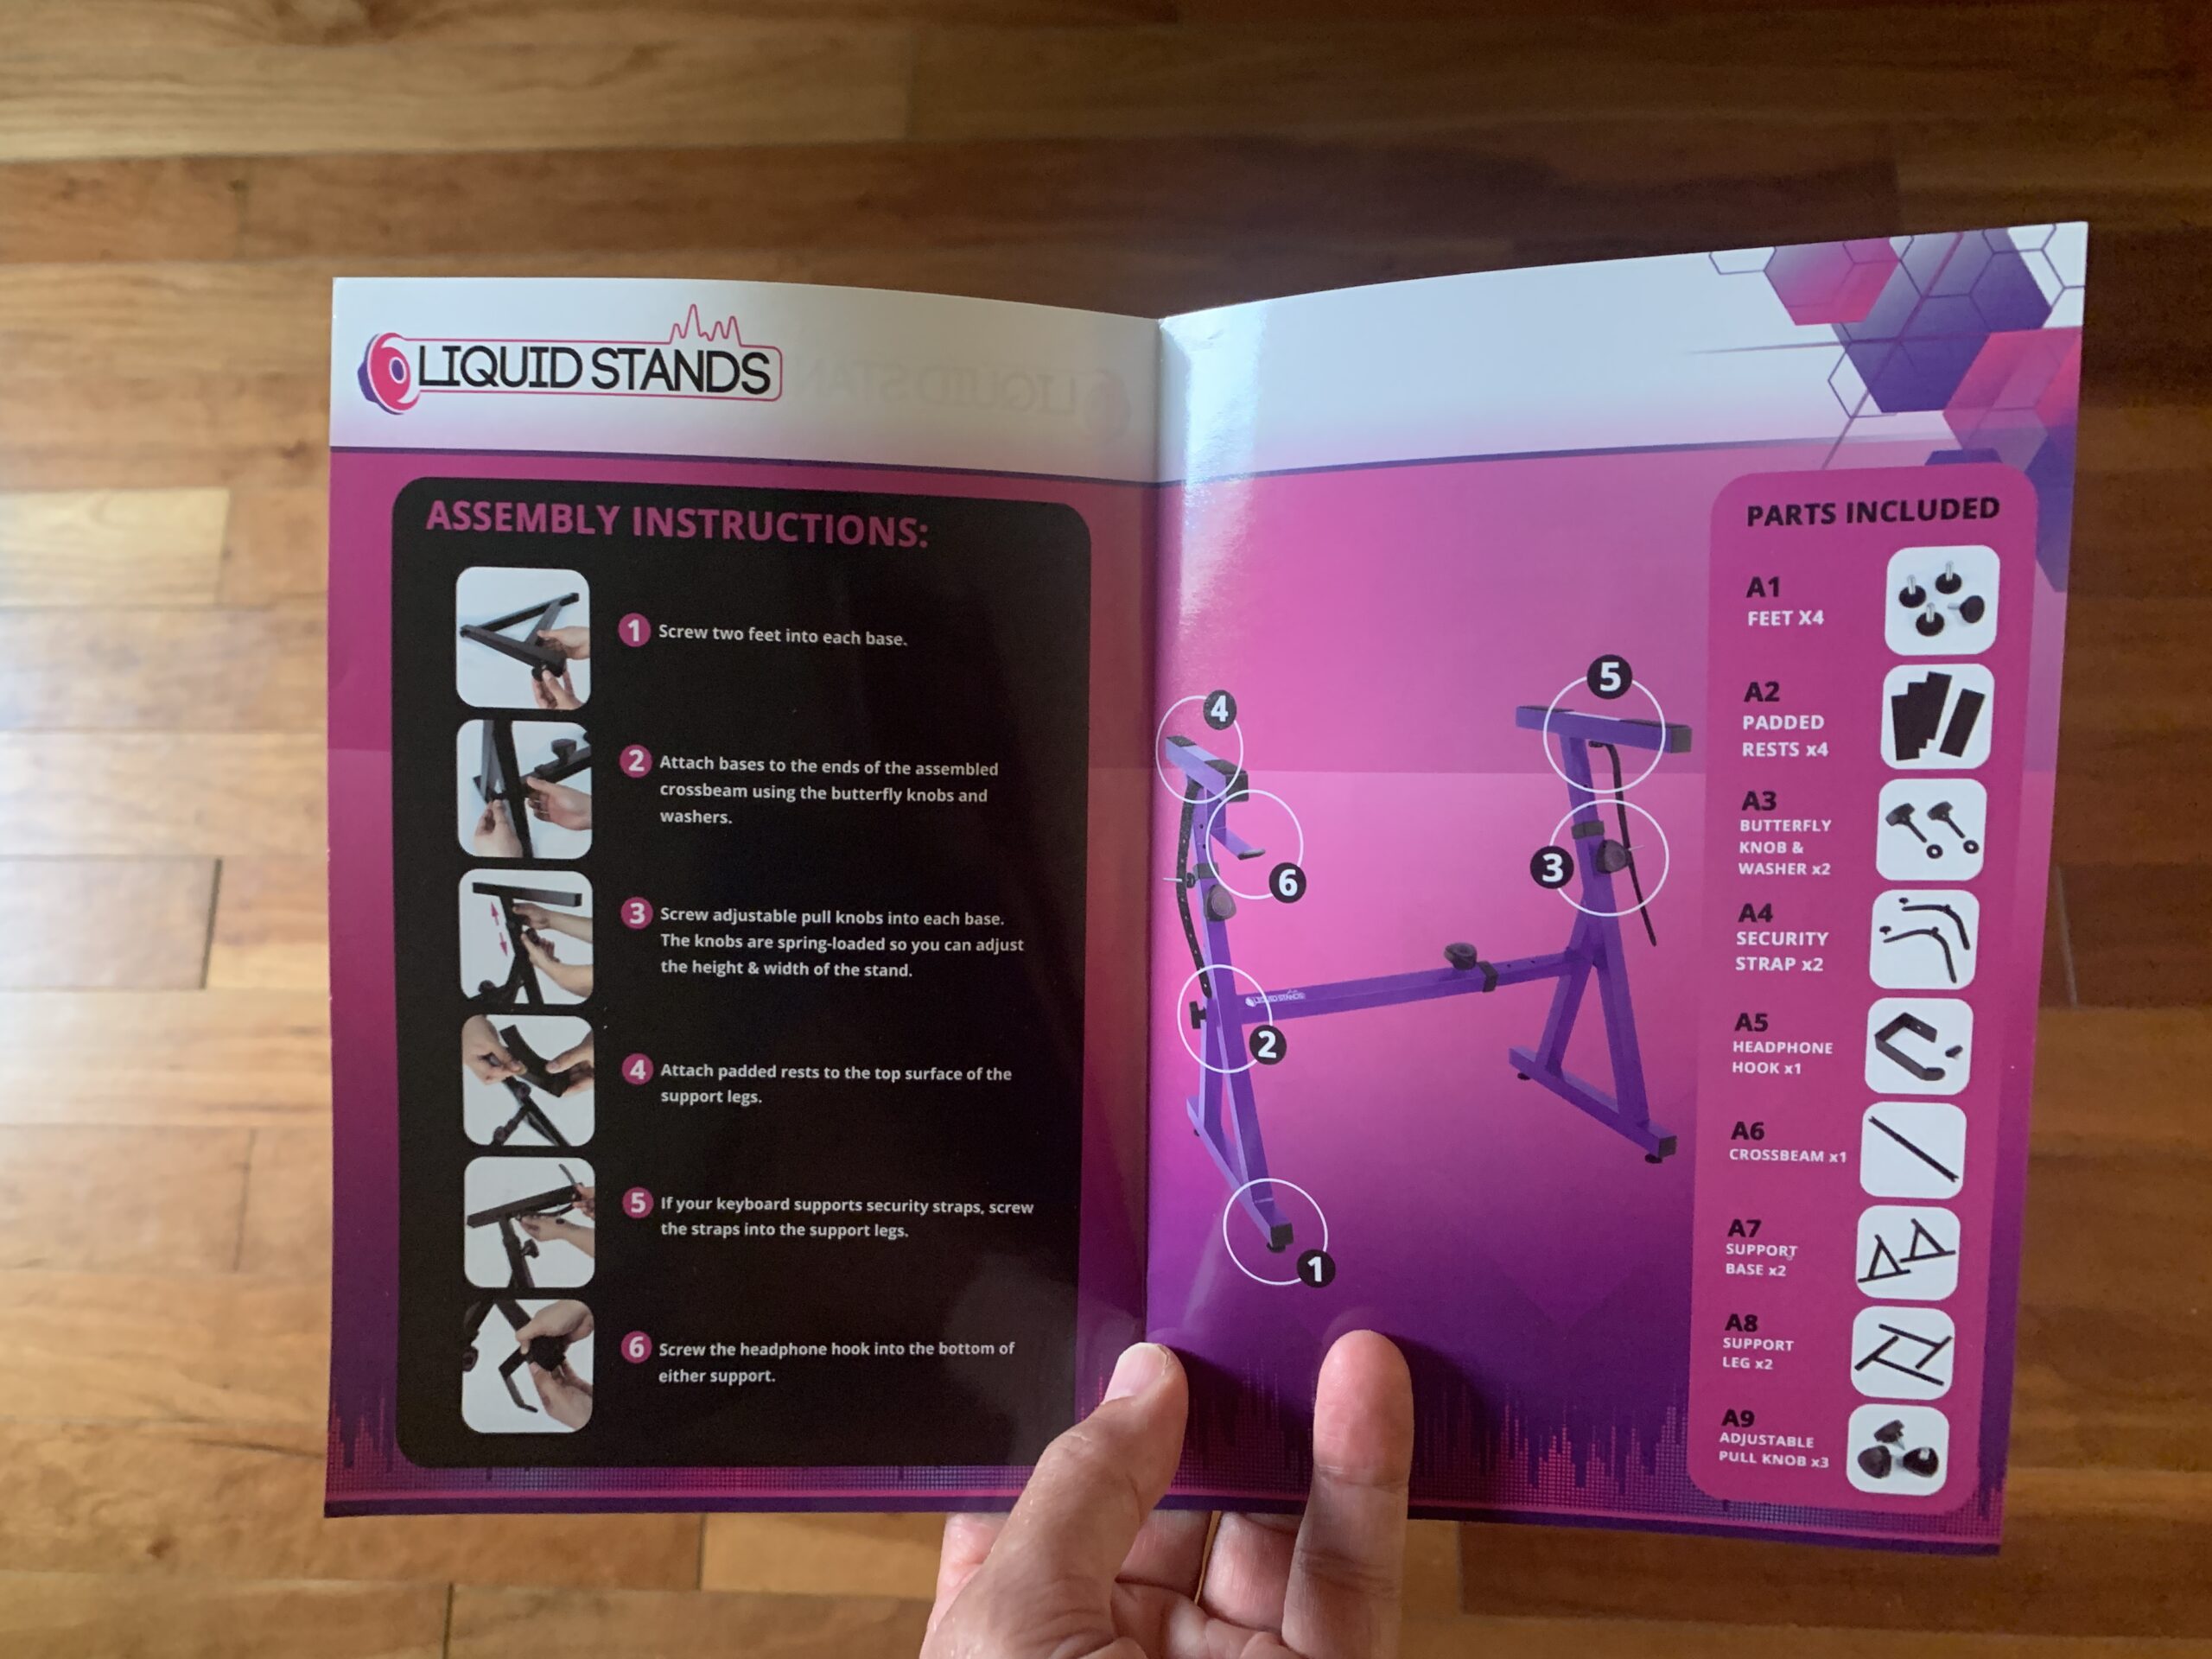
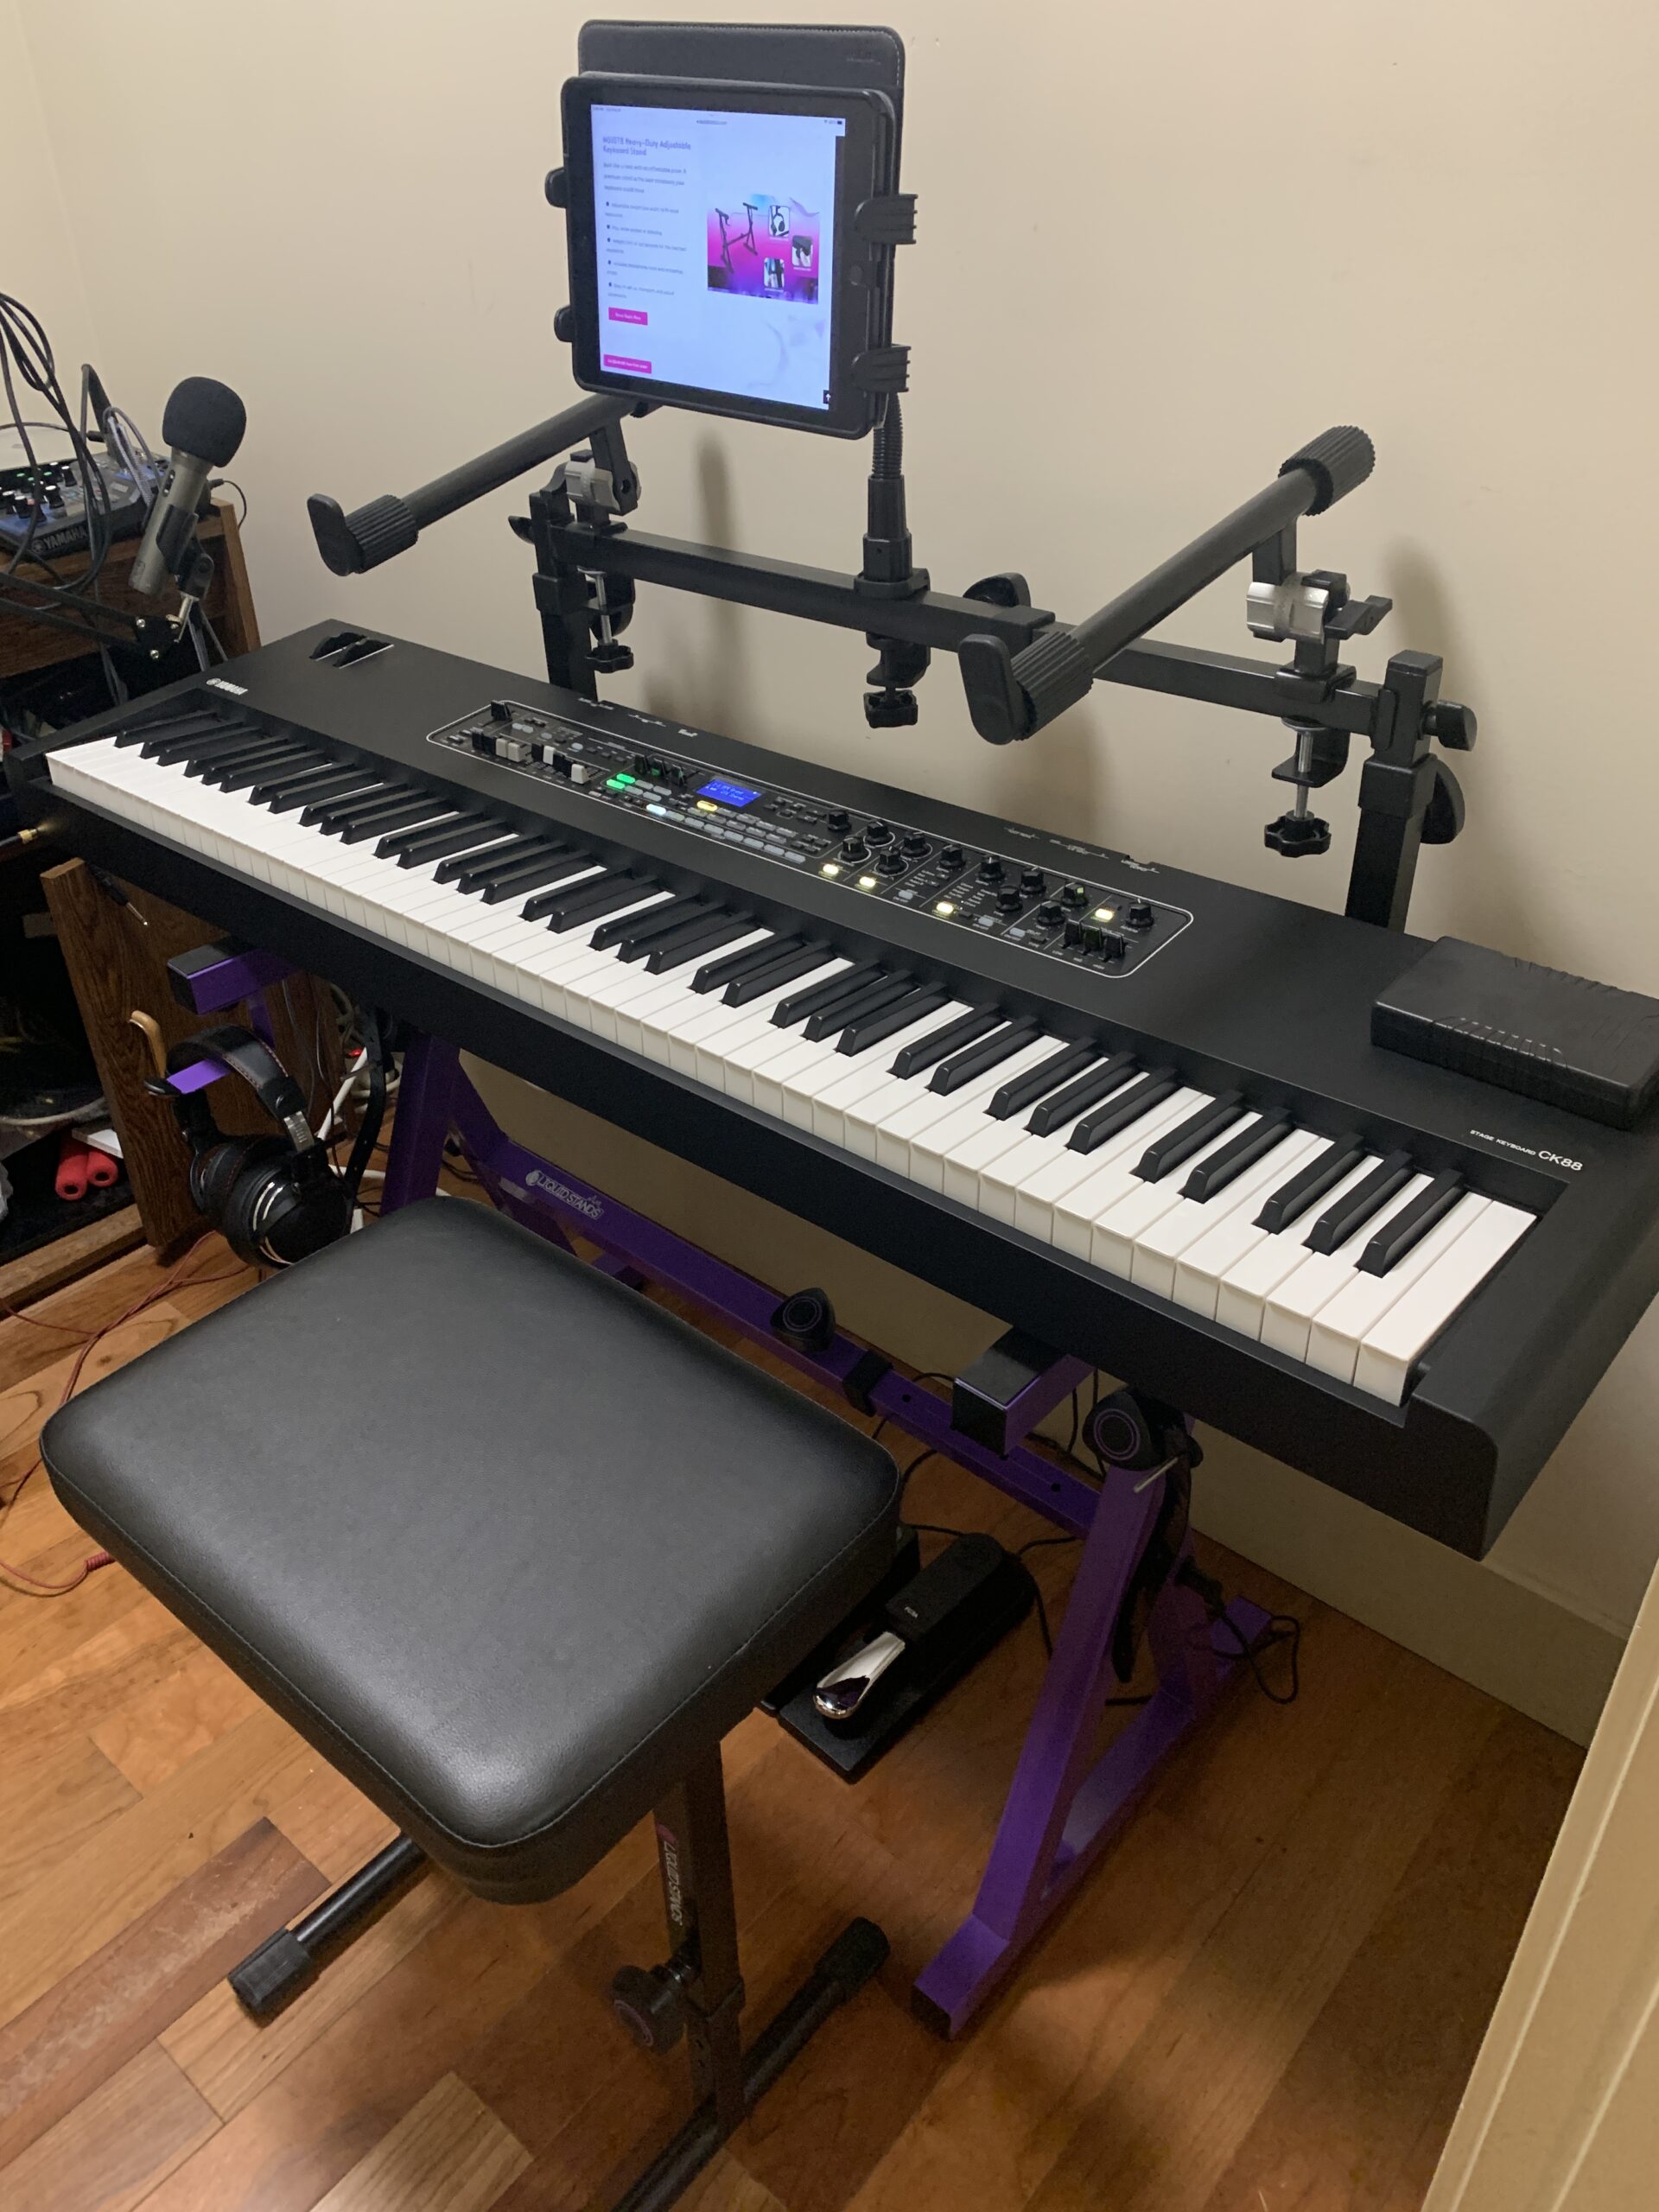
The main stand actually comes in just 3 pieces and includes pouches of clearly labelled hardware. And once assembled, this stand really is a beast – it is SO sturdy and strong it’s crazy, and it doesn’t wobble in the slightest. It has a weight limit of a whopping TWO HUNDRED AND FIFTY POUNDS (so that would be FIVE of my heavy and bulky Yamaha DGX-670’s that I could pile up on this stand which is crazy). At my band practices I’m using a decent quality double X brace stand with my Yamaha CK88 digital piano and it wobbles a TON when I play; when I’m practicing at home, my piano doesn’t budge no matter how hard I’m playing.
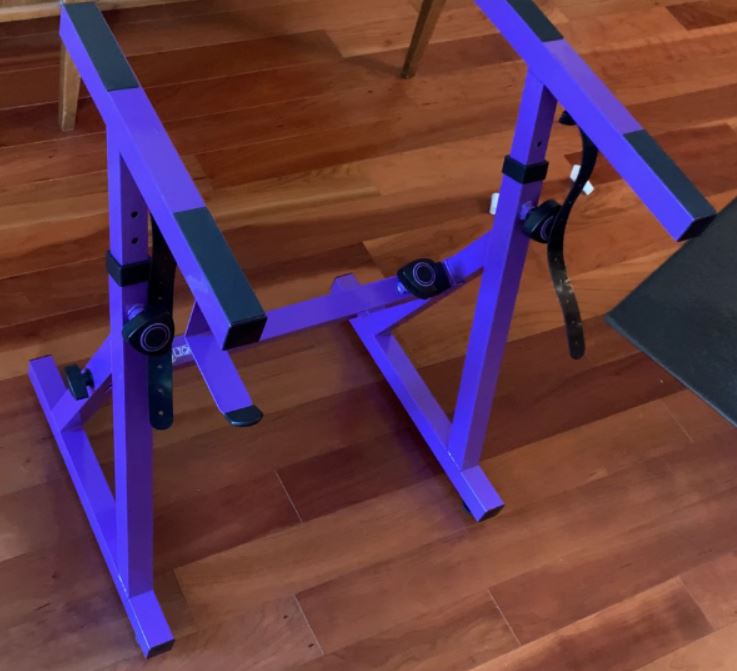
There are pads that you attach to pad and protect the bottom of your keyboard, there are really thick straps that you can use if you want to secure your keyboard even further (assuming it has the proper holes on the bottom of it); I don’t bother with that because the stand is so sturdy anyways, AND I’m constantly moving my keyboards around. It’s super easy to quickly adjust the height and width with these spring knobs; you loosen them then pull to make adjustments, and the metal knob will pop into the next hole when you reach it, then you tighten it back up. You can adjust both the height and the width of the stand from anything between 22.5 and 33.5 inches so you should be able to find the right height for sitting or standing, and I have to mention I was happy to see that the stand goes low enough to accommodate thicker keyboards like my Yamaha CK88 which is pretty thick at almost 6 inches; but I have the stand at the lowest slot and it’s perfect (and I could actually lower it a bit more by not even using the first slot and just letting the arms slide down a bit further into the base).
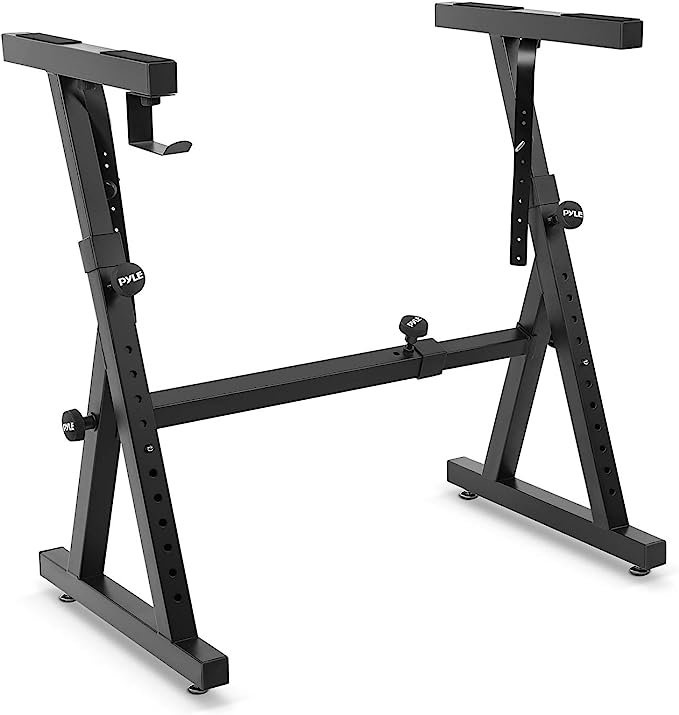
So in comparing just the main Liquid Stands z-stand to my old stand? The old stand was totally ok, and it was way better than any X brace stand I’ve ever tried, and I was pretty impressed with it (especially the main stand) . . . until I saw the Liquid Stands Z stand which is just . . well . . . better in pretty much every category. On the main stand, the bars themselves are all a bit thicker, but more importantly: noticeably sturdier feeling. The knobs on the Liquid stands are all pull knobs that you loosen and then pull to adjust and then tighten – on my old stand, there was a peg that you pushed in to release the leg from a hole then you slid VIDEO ON OLD STAND it up and down until it pops into the hole you want; all that screwing in the knob does is press against the bar itself, so as a result it’s nowhere near as stable. And on the cross brace on the main stand, the Liquid Stands version is not only thicker, but it has a pull knob and pin holes in the cross brace to secure it in place, where the old stand has no pin holes – you’re just screwing the knob on that one to press directly against the bar. So if I brace the bottom of my old stand, make sure the arm is as tight as possible, then try wiggling it, there is quite a bit of side to side movement; but if I do the same thing on the Liquid Stands model; no movement at all. And one part of the old stand I actually found kind of frustrating was the headphone hook of all things; it would simply not stay in tight – I could retighten it as many times as I wanted to, and within a day or two it would be spinning in circles; the hook on the Liquid Stands model is far better – it’s nice and thick, doesn’t move and even has a nice plastic tip on it. VIDEO OF HEADPHONE And as I mentioned, given my hardwood floor, I’m not using the wheels, but here
PIC OF WHEELS
they are – like the rest of of the stand, they look really well made and they have a pretty beefy locking mechanism on them. And I should also mention if you’re using the feet instead of the wheels, you can adjust those as well if you’re not on a level surface. So, verdict on the main Z stand? Fantastic!
Liquid Stands 2nd Tier
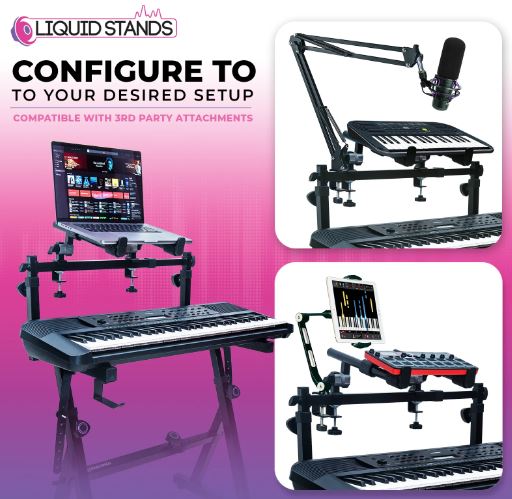
The 2nd tier from Liquid Stands is . . . well . . . ALSO FANTASTIC! The 2nd tier’s not only super well built and sturdy like the main stand is, but it actually offers some other very cool features. Most 2nd tier stands that I’ve seen, including my old one, tend to have much narrower bars and less heavy duty knobs and hardware than the main stand they’re attached to; but this one has bars on it that are ALL close to the thickness and just as sturdy feeling as the bars on the main stand, and it uses the same really sturdy feeling pull knobs. And the arms that hold the 2nd tier keyboard have much bigger and heavier duty plastic pieces to hold that keyboard in place. The 2nd tier attaches by popping out the back plastic cover on the main stands side bars, then when you insert the base and tighten the bolt, the 2 pieces open up and grab on to the inside. And when this is tightened? They are super solid and stable, even BEFORE adding the cross brace. So, given how the upper tier attaches; you can actually use this upper tier with ANY other main keyboard stand that has 1.25” square tubing, so super cool. PICTURE OF 2ND TIER ATTACHMENT And the cross brace, which is also thick and sturdy, really makes the second tier super stable. The weight limit on the 2nd tier is SIXTY pounds which is crazy; I could even put my 50 lb Yamaha DGX-670 on the SECOND tier of this stand (although I’d need someone to help me lift it up there 😉) For height adjustments, there are SEVEN pinholes to choose from, so it can go from 14 inches to 22.5 inches! And the upper arms have REALLY heavy duty gears where you can make TONS of very minute adjustments to the angle that your upper keyboard will rest at.
But apart from the upper tier being SUPER strong and stable, I mentioned there are a couple of COOL features, and they both have to do with the cross brace bar. On most stands I’ve tried out, including my old one, the upper arms need to be set at the same width as the main lower stand legs are at, because the arms that hold your upper keyboard are just attached to the end of the telescoping bars. But what Liquid stands did, which is SUPER cool and super useful, is attach their arms to the cross brace instead (so you can slide these back and forth to wherever you want them). This is awesome, because then you can have your upper and lower tiers each be set to whatever width works for you. I did a video a short while back with my old stand that had my Yamaha CK88 on the bottom tier and a 49 key MIDI keyboard on the top; and because both tiers had to be set to the same width, I had to set the LOWER tier holding my Yamaha to a much narrower width than I was comfortable with (I had to be careful not to put too much pressure on either end of my piano, or bump it while it was set up like that). But with this stand, I can leave the bottom tier set at a nice stable wide width for my piano, and make the top tier as narrow as I want. Now one other SUPER cool benefit of this sturdy cross bar, is it gives you an opportunity to mount all sorts of other stuff to the crossbar. I have a mic boom arm, an iPhone boom arm and clip, and an iPad tablet mount that I have on here now – this is a REALLY handy feature! I’ve filmed tons of videos in this tiny room, and it’s always challenging for me to find a place to mount my mic boom, and actually even more challenging to find a spot to mount my iPhone camera to get a nice overhead view of a keyboard menu for a video – this is going to offer me a great opportunity moving forward.
So, comparing the UPPER tier to my old stand; there’s really no comparison here – the one on my old stand was OK and did the job, but was definitely nowhere near as strong or sturdy, it actually only had THREE height adjustments instead of SEVEN, and after owning it for a few months, the upper tier arms actually kind of moved out of line with each other; and, that cross brace not only makes the Liquid Stands version way sturdier, it also offers the ability to mount stuff on it, so . . . super happy to have an improved stand to use.
Liquid Stands Z-Stand & 2nd Tier – THE VERDICT
So, the verdict on the Liquid Stands Z-style keyboard stand, AND the optional upper tier? These are both fantastic products, I can’t recommend them highly enough, if you’re looking for a single or 2 tier stand; you should definitely check these out. I’ve left some affiliate links below if you want to check out current prices for Liquid Stands products in your area.
I have included links below to Amazon & Liquid Stands direct so that you can check current pricing – please note that as an affiliate I earn from qualifying purchases:
Liquid Stands Z-Stand (No Wheels)
Liquid Stands Z-Stand (With Wheels)
Video Version Of This Review (Includes The Assembly Process At The End):
Piano Training I Recommend
I’ve taken a number of online piano courses and tried various piano learning apps; the ones I’m listing here are my favorites and I can highly recommend any of these if you are looking for some online training to get started on learning piano, or to take your current skills to the next level.
Bird’s Piano Academy is one of my absolute favorite online piano programs. Arthur Bird has created multiple courses on getting started learning piano quickly as well as great intro courses on Blues, Jazz and more. And his courses are chord based, so you don’t have to read sheet music which is AWESOME and definitely the fastest way to learn to play modern music. You can go with a subscription that includes ALL his courses, or you can buy individual courses a la carte with LIFETIME access – HIGHLY RECOMMENDED!

If you’re looking for the least expensive way to get started on piano, Pianoforall is a great option. It’s a unique course created by Robin Hall that uses downloadable eBooks with embedded videos and audio instead of a website.
This course is an amazing option for learning piano from beginner up to being able to perform; it teaches multiple genres of music and focuses on how to be a “one person band” on the piano. This course is taught by pro pianist Steve Lungrin – Steve has been teaching and performing his whole adult life and is a fantastic instructor and performer.
I took this course from 2020 to 2021 and it elevated my playing from a very basic level to being able to play songs in multiple genres.
I was super excited when Simply Piano added the “Chords Path” to their super popular piano training app (iOS or Android); this path allows a new student to get started learning piano using a chords based approach (which I HIGHLY recommend over a traditional approach). Learning to play using chords is by far the easiest and fastest way to learn to play modern songs (MINIMAL sightreading ability is needed). I did the entire chords path, and can highly recommend that you check it out (you will get a trial period so why not?)

This is a fantastic option if you are mostly interested in rock music. This course was created and is taught by Marine Lacoste, who is not only a fantastic instructor & pianist, but she is also a very accomplished hammond organ player – she performs regularly with her own band, as well as playing keys regularly for multiple recording artists on tour. I started this course in 2023 when I joined a band, and it is helping me greatly in taking my playing to a new level. And Marine is constantly adding new content, and is very active on the platform.
If you sign up for Online Rock Lessons yearly subscription, use code PIANOTONE at checkout to let Marine know I referred you, and she will give you some free bonuses!
This is a fantastic (but pretty unique) online program for taking your piano and organ playing skills to the next level, developed by pro piano, keyboard & Hammond organ player Mike Little. Mike shares tips & tricks accumulated from over 30 years of pro touring, gigging, studio & production experiences. This course isn’t for a COMPLETE beginner, but you don’t have to be a super accomplished player either, to get TONS of value from this program!

Ultimate Piano isn’t an actual course to learn how to play, but it IS a really helpful TOOL for piano students. You connect your keyboard to your computer, go to Ultimate Piano’s website (so NOTHING to install!) and you have a ton of helpful training and exercises at your disposal, as well as built in piano sounds. With the help of on screen light up keys, you can learn and practice scales, chords and even ear training and you can play along with MIDI or audio files, and even YouTube videos to practice songs!